
Why I Chose VMware
Discovering Claude Code
Claude Code is Anthropic’s groundbreaking AI pair programming tool. It lets you interact with Claude from the command line, generating, debugging, and refactoring code in natural language. This powerful approach is drawing attention across the developer community.
I wanted to try Claude Code, but setting it up on Windows was tricky. With my background in networking and virtualization, I decided to explore the latest AI tools using a VMware environment.
Questioning the WSL-Only Mindset
Most search results suggest using WSL to run Claude Code on Windows, as if it were the only option. This felt wrong. Having worked with virtualization for years, I wondered if a traditional VM could handle it just as well.
WSL is excellent, but relying solely on it limits our choices. To bridge old and new tech, I decided to try Claude Code on VMware.
Using What We Already Have
Many developers already run VMware. Reusing an existing VM is often easier than installing WSL from scratch.
A fully isolated Linux VM prevents accidental interference with Windows, and snapshots let us quickly back up and restore our setup.
Technical Advantages
VMware’s virtual network editor offers GUI-based control over NAT, bridging, host-only mode, port forwarding, and DHCP ranges—fine-grained network management that WSL lacks.
Compared to VirtualBox, VMware is widely used in enterprise environments and is known for stability and performance.
Why Learning Old Tech Still Matters
Some articles dismiss virtualization as outdated, but many production systems still rely on VMs. Knowing how to build a VMware-based development environment remains a valuable skill.
Hands-on experience with networking—TCP/IP, DHCP, NAT, and so on—strengthens your engineering fundamentals.
Summary
WSL is great, but VMware is equally useful. This article shows a practical alternative to the “WSL or nothing” mindset and encourages flexible technology choices.
The Real Issues with WSL
The Problem of Growing VHDX Files
While WSL is often praised for being lightweight, its virtual disk (VHDX) can expand endlessly. I covered this in detail in another article about cleaning up WSL2 disks.

Theory vs. Practice
In theory WSL is small, but in practice it can eat up disk space and slow down I/O. Shrinking VHDX files requires manual maintenance.
Why This Doesn’t Happen in VMware
VMware offers transparent disk management, easy resizing, an independent file system, and snapshots—problems that don’t plague WSL.
Impact on Claude Code
Developers constantly create and delete files, which causes WSL disks to grow over time. VMware avoids this issue, so you can focus on using Claude Code.
Choosing Practicality
Instead of chasing “lightweight” solutions, it’s better to choose a setup that works reliably. VMware lets us learn and use Claude Code without hidden problems.
Setting Up Node.js
Prerequisites
Make sure you’re running Ubuntu Desktop 25.04 in VMware, with VS Code installed and working internet access.
Why Use the VS Code Terminal?
Using VS Code’s integrated terminal keeps your editor and shell in one place, matching how many developers actually work.
Why Choose nvm?
There are several ways to install Node.js. nvm (Node Version Manager) makes it easy to switch versions and is commonly used in real projects.
- Handles projects that require specific Node.js versions
- Lets you update or roll back easily
Installing nvm
Open the integrated terminal (Ctrl + Shift + `) and run:
curl -o- https://raw.githubusercontent.com/nvm-sh/nvm/v0.40.3/install.sh | bashReload your shell with source ~/.bashrc, then confirm:
nvm --versionInstalling Node.js
Install the LTS release for stability:
nvm install --lts
nvm use --lts
node -v
npm -v
VMware-Specific Checks
Ensure networking works by running ping google.com. If you use shared folders, create projects inside your VM’s home directory to avoid permission issues.
Troubleshooting
If nvm isn’t found, restart the terminal or run source ~/.nvm/nvm.sh. Slow downloads might require adjusting DNS settings in VMware’s network editor.
Installing and Setting Up Claude Code
Optimized for VMware
Unlike WSL guides that suggest extra install options, on a real Ubuntu VM you can simply run:
npm install -g @anthropic-ai/claude-codeThat’s all—no --force or --no-os-check needed.
Before Installing
Check node -v and npm -v to confirm your Node.js environment is ready.
Installation Example
An example install finishes in about four seconds and only adds a few packages.
Verify the Install
Run claude -v to check the installed version.
Optional npm Update
If npm suggests an update, you can run npm install -g npm@11.4.1, but the current version works fine.
Prepare Your Workspace
Create a dedicated workspace in your home directory:
cd ~
mkdir claude-workspace
cd claude-workspace
mkdir test-project
cd test-project
Working under your home directory avoids permission issues with VMware shared folders.
First Launch
Run claude to start the tool. Choose a theme and log in using either a Claude subscription or an Anthropic Console account.
Follow the on-screen steps to authenticate. The process includes opening a URL, signing in, and granting access.
Once logged in, you’ll see security notes reminding you to review generated code and beware of prompt injection.
Terminal Settings and Folder Trust
Claude Code asks if you want to apply recommended terminal settings (Shift+Enter for newlines) and whether you trust the current folder. Only allow trusted folders.
Startup Confirmation
After confirming, Claude Code starts and installs its VS Code extension automatically, enabling quick commands and file diff viewing.
VS Code Integration
The extension integrates seamlessly: press Cmd+Esc to open Claude Code, or use Ctrl+Alt+K to insert file references. Everything works right away in VMware.
API Key Setup
If you use an Anthropic Console account, obtain an API key from console.anthropic.com and manage it securely.
Check the Config Files
Your configuration lives under ~/.config/claude-code/.
Testing in VMware
Verify network access to the Anthropic API:
curl -I https://api.anthropic.comCreate a small file and ask Claude to improve it:
echo "console.log('Hello, Claude Code!');" > test.js
claude "Improve this JavaScript file"
Troubleshooting Tips
- “command not found: claude”: check your npm global path and add it to
$PATHif needed. - API connection errors: confirm VMware NAT and DNS settings, or any proxy configuration.
- Permission errors: clear npm cache and reinstall Claude Code.
Performance Tuning
- Allocate at least 4 GB RAM (8 GB recommended).
- Use two or more CPU cores.
- An SSD greatly improves disk performance.
# Check system resources
htop
# Configure swap if needed
free -h
Confirming Setup
Claude Code is ready to use. Key factors for success on VMware include simple installation, reliable networking, smooth VS Code integration, and painless OAuth authentication.
This approach keeps your host OS untouched and allows full control with snapshots for safe testing—ideal for corporate environments.
Getting Started
Try Claude Code by asking it to create a simple project:
Create a simple Python hello world scriptStart small, give clear instructions, review proposed changes, and leverage the benefits of a fully isolated VMware environment. This proves WSL isn’t the only option for running Claude Code on Windows.
Installing Claude Code on VMware
1. Pre-installation checks
Open the integrated terminal in VS Code and verify that Node.js is available:
node -v
npm -v
Make sure both commands return version numbers.
2. Install Claude Code
With Ubuntu running in VMware, installation is straightforward:
npm install -g @anthropic-ai/claude-codeExample installation output:
added 3 packages in 4s
2 packages are looking for funding
  run `npm fund` for details
npm notice
npm notice New major version of npm available! 10.9.2 -> 11.4.1
npm notice Changelog: https://github.com/npm/cli/releases/tag/v11.4.1
npm notice To update run: npm install -g npm@11.4.1
npm notice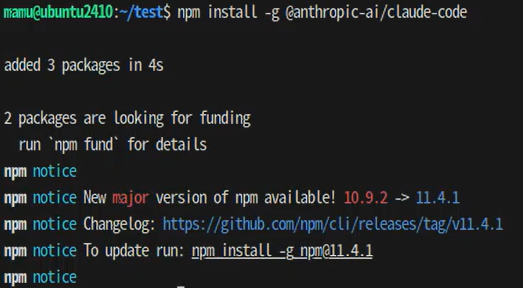
This output confirms that on VMware:
- Installation completes without errors
- Only three packages are required
- Setup finishes in about four seconds
Why WSL-specific options aren’t needed:
npm config set os linux: Ubuntu already reports itself as Linux--force: unnecessary unless there are dependency conflicts--no-os-check: no need to bypass OS detection
3. Verify the installation
Check the version after installation:
claude -vIf installed correctly, the command shows the Claude Code version.
4. Optional: responding to npm update prompts
If npm warns about a new version:
npm install -g npm@11.4.1The current version works fine with Claude Code, so updating npm is optional.
Prepare a clean directory structure
Instead of scattering files everywhere, create an organized workspace.
1. Create a project directory
# Go to your home directory
cd ~

# Create a workspace
mkdir claude-workspace
cd claude-workspace

# Make a test project directory
mkdir test-project
cd test-project
2. Why use the home directory?
Working inside your home folder avoids permission issues and makes snapshots easy. VMware shared folders can cause problems when npm installs packages.
Initial setup of Claude Code
1. First launch
claudeOn first launch you’ll see a welcome screen:
🎉Welcome to Claude Code

Let's get started.

Choose the text style that looks best with your terminal:
To change this later, run /theme

1. Dark mode
2. Light mode
3. Dark mode (colorblind-friendly)
4. Light mode (colorblind-friendly)
5. Dark mode (ANSI colors only)
6. Light mode (ANSI colors only)

Preview
function greet() {
  console.log("Hello, World!");
  console.log("Hello, Claude!");
}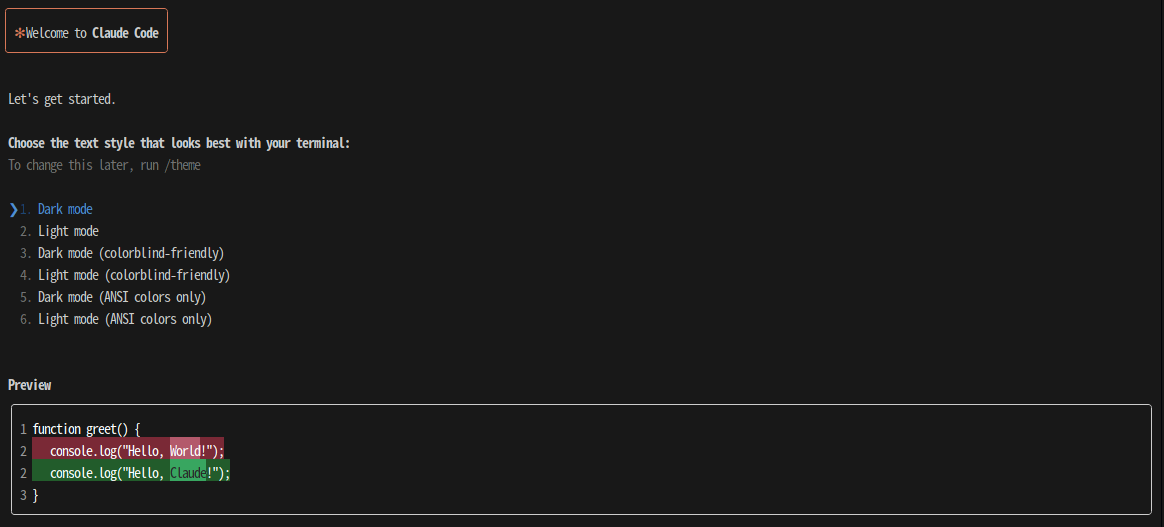
Select the theme that suits your terminal. In VMware with Ubuntu, Dark mode usually works best.
2. Choose a login method
After selecting a theme, Claude Code displays its logo and prompts you to choose how to sign in:
 ██████╗██╗      █████╗ ██╗   ██╗██████╗ ███████╗
██╔════╝██║     ██╔══██╗██║   ██║██╔══██╗██╔════╝
██║     ██║     ███████║██║   ██║██║  ██║█████╗
██║     ██║     ██╔══██║██║   ██║██║  ██║██╔══╝
╚██████╗███████╗██║  ██║╚██████╔╝██████╔╝███████╗
 ╚═════╝╚══════╝╚═╝  ╚═╝ ╚═════╝ ╚═════╝ ╚══════╝
 ██████╗ ██████╗ ██████╗ ███████╗
██╔════╝██╔═══██╗██╔══██╗██╔════╝
██║     ██║   ██║██║  ██║█████╗
██║     ██║   ██║██║  ██║██╔══╝
╚██████╗╚██████╔╝██████╔╝███████╗
 ╚═════╝ ╚═════╝ ╚═════╝ ╚══════╝

Claude Code can now be used with your Claude subscription or billed based on API usage through your Console account.

Select login method:

1. Claude account with subscription
   Starting at $20/mo for Pro. $200/mo for Max - Best value, predictable pricing

2. Anthropic Console account
   API usage billing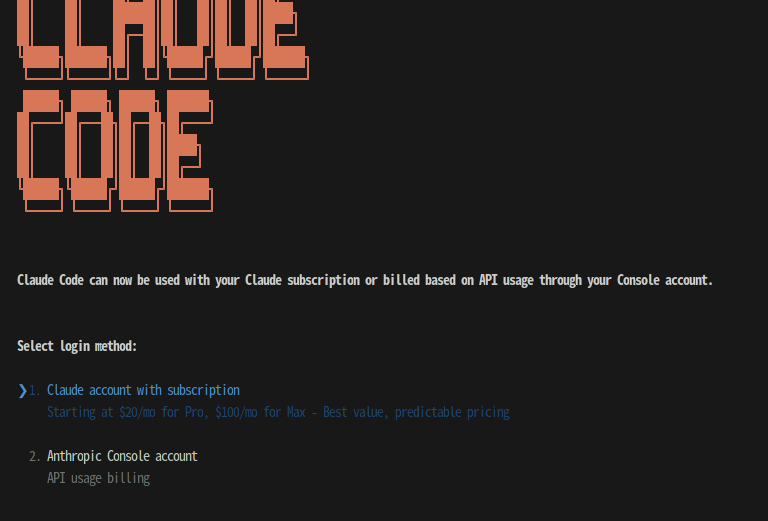
Login options:
- Option 1: Claude subscription (flat monthly rate)
- Option 2: Anthropic Console account (usage-based billing)
For beginners or casual use, option 2 is usually more economical.
3. Authentication steps for subscriptions
If you chose option 1 (Claude subscription), follow these steps:
1. Display the authentication URL
Browser didn't open? Use the url below to sign in:

https://claude.ai/oauth/authorize?code=true&client_id=...
(long URL)

Paste code here if prompted >
2. Authenticate in your browser
- Open the displayed URL in a browser
- You can use either the Ubuntu browser inside VMware or a browser on the host OS
- The Claude.ai login page appears
3. Select how to log in—the page offers:
- Continue with Google
- Continue with email

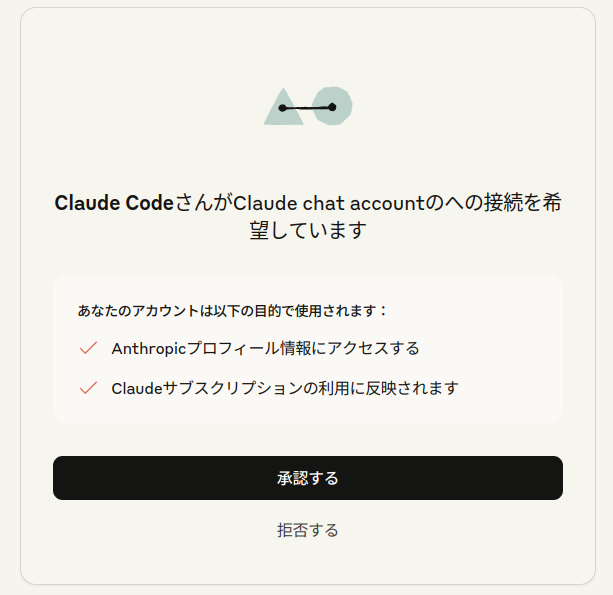
4. Grant permissions After logging in, you are asked to authorize Claude Code:
Claude Code would like access to your Claude chat account

Your account will be used for:
✓ Accessing your Anthropic profile
✓ Applying your Claude subscription

[Authorize] [Decline]
Click Authorize to allow Claude Code to connect to your chat account.
5. Confirm authentication After approval, the terminal displays:
Browser didn't open? Use the url below to sign in:

https://claude.ai/oauth/authorize?code=true&client_id=...
(authentication URL)

Logged in as encounterchat@gmail.com

Login successful. Press Enter to continue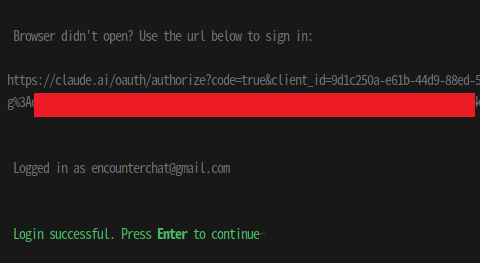
This confirms:
- Login account: the authenticated email address appears
- Successful authentication: “Login successful” is displayed
- Next step: press Enter to continue
6. Review the security notes Press Enter and Claude Code shows important warnings:
🎉Welcome to Claude Code

Security notes:

1. Claude can make mistakes
   You should always review Claude's responses, especially when
   running code.

2. Due to prompt injection risks, only use it with code you trust
   For more details see:
   https://docs.anthropic.com/s/claude-code-security

Press Enter to continue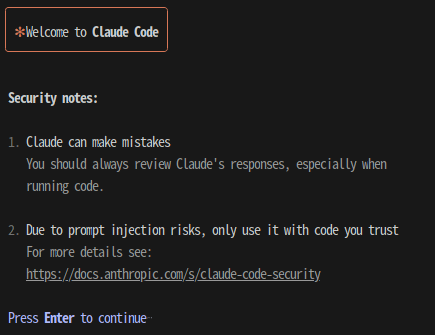
Important security reminders:
- Claude can make mistakes
- Always review generated code before running it
- Be especially cautious with system-level commands
- Prompt injection risks
- Use Claude Code only with trusted codebases
- Check the security documentation when in doubt
7. Choose terminal settings After reading the notes, you’re prompted to configure terminal options:
🎉Welcome to Claude Code

Use Claude Code's terminal setup?

For the optimal coding experience, enable the recommended settings
for your terminal: Shift+Enter for newlines

1. Yes, use recommended settings
2. No, maybe later with /terminal-setup

Enter to confirm • Esc to skip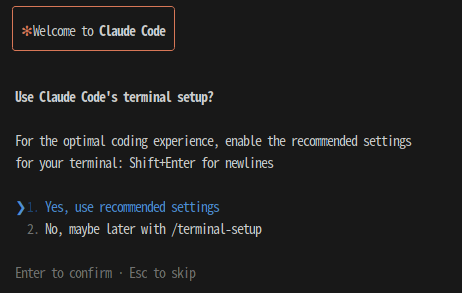
Available choices:
- Use the recommended settings for the best coding experience
- Configure later with the
/terminal-setupcommand
Details of the recommended settings:
- Press Shift+Enter to insert newlines, handy for multi-line input
- Other optimized terminal options
In a VMware + VS Code setup, choosing “1. Yes, use recommended settings” is advised.
8. Confirm folder trust After configuring the terminal, you’ll be asked whether you trust your working folder:
Do you trust the files in this folder?

/home/mami/test

Claude Code may read files in this folder. Reading untrusted files may lead Claude Code to behave in unexpected ways.

With your permission Claude Code may execute files in this folder. Executing untrusted code is unsafe.

https://docs.anthropic.com/s/claude-code-security

1. Yes, proceed
2. No, exit

Enter to confirm • Esc to exit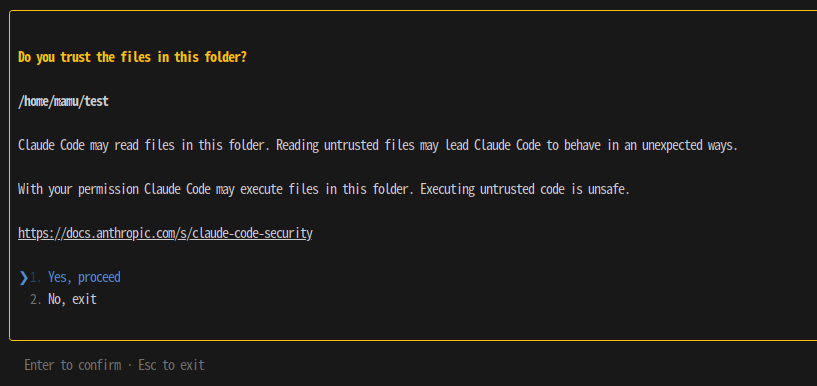
Key security points:
- File read permissions: Claude Code can access files in this folder
- Code execution rights: It may run scripts in this folder
- Only choose “Yes, proceed” for folders you trust
Benefits of using VMware:
- Run tests in a completely isolated environment
- Keep the host OS fully protected
- Use snapshots for a safe place to experiment
9. Claude Code startup complete After selecting “Yes, proceed,” Claude Code launches and shows this message:
Tips for getting started:

1. Ask Claude to create a new app or clone a repository
2. Use Claude to help with analysis, editing, bash commands and git
3. Be as specific as you would with another engineer for the best results
4. ✓Run /terminal-setup to set up terminal integration

Tip: Start with small features or bug fixes, tell Claude to propose a plan, and verify its suggested edits

🎉Claude Code extension installed in VS Code!
Version: 1.0.17

Quick start:
• Press Cmd+Esc to launch Claude Code
• View and apply file diffs directly in your editor
• Use Ctrl+Alt+K to insert @file references

For more information, see https://docs.anthropic.com/s/claude-code-ide-integrations

Press Enter to continue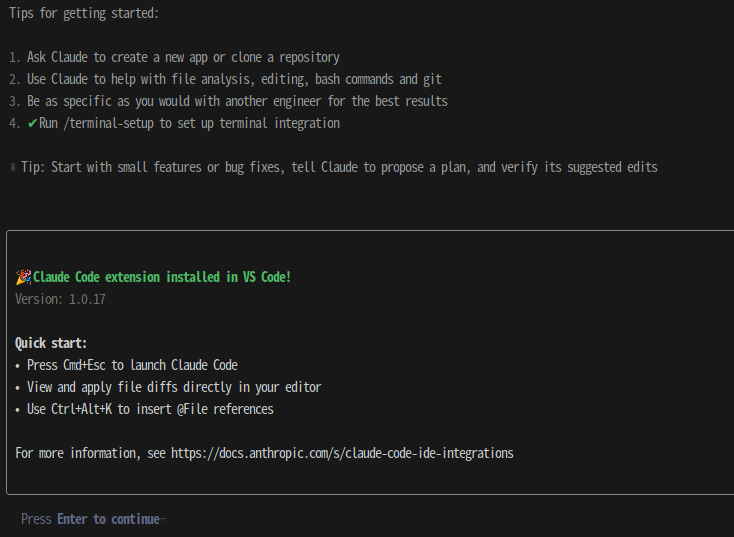
What this screen confirms:
- ✅ Helpful tips are displayed
- ✅ The VS Code extension installs automatically (version 1.0.17)
- ✅ Shortcut keys are shown
- ✅ Integration features are described
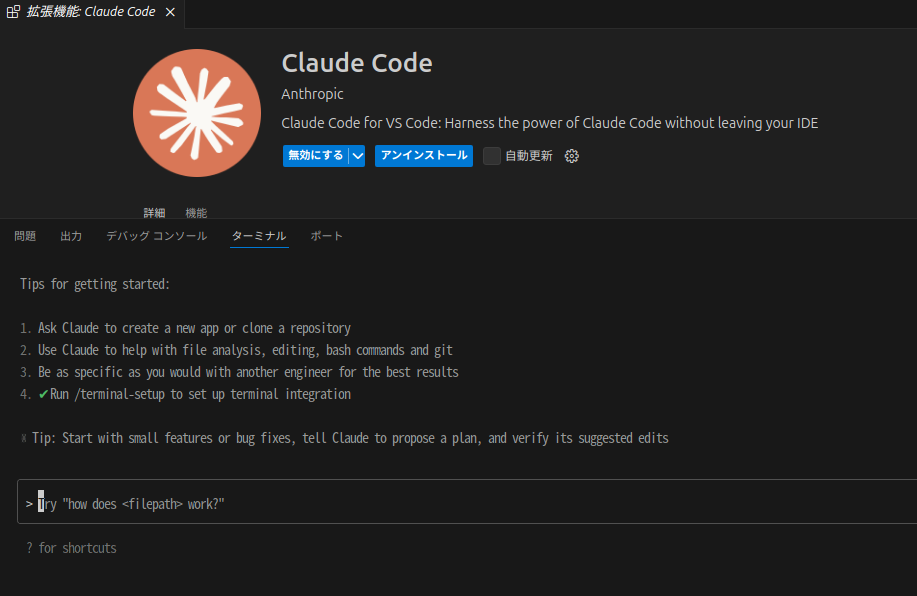
Automatic VS Code Integration
After setup, open VS Code and you’ll see the Claude Code extension already installed and enabled:
Extension details:
- Name: Claude Code for VS Code
- Publisher: Anthropic
- Description: Harness the power of Claude Code without leaving your IDE
- Status: Automatically installed and enabled
Integrated features include:
Tips for getting started:

1. Ask Claude to create a new app or clone a repository
2. Use Claude to help with file analysis, editing, bash commands and git
3. Be as specific as you would with another engineer for the best results
4. ✓Run /terminal-setup to set up terminal integration

💡 Tip: Start with small features or bug fixes, tell Claude to propose a plan, and verify its suggested edits
What’s different from other articles: Many guides neglect to mention this automatic integration. With VMware:
- One-stop setup: CLI and VS Code extension are installed together
- No manual search: You don’t need to visit the Marketplace
- Ready to use immediately: Shortcuts and file integration work out of the box
- Version consistency: The CLI and extension versions match perfectly
Why VMware offers strong integration:
- Stable network settings ensure smooth extension downloads
- No permission issues—the extension runs without trouble
- Unlike in some WSL setups, extension conflicts rarely occur
Advantages of VMware:
- Sharing URLs between host and guest is easy
- A shared clipboard lets you copy long URLs effortlessly
- You can choose between Firefox inside Ubuntu or any browser on Windows
6. Setting an API key (for Console accounts)
If you selected option 2 (Console account):
- Obtain an API key from Anthropic Console
- Even for testing, keep the key secure
- In VMware, you can omit the key before taking a snapshot
7. Check the configuration files
Claude Code stores its settings here:
ls -la ~/.config/claude-code/VMware-specific operation checks
1. Test the network connection
Claude Code needs to reach the Anthropic API. Verify connectivity:
# Check access to the Anthropic API endpoint
curl -I https://api.anthropic.com
A valid HTTP status code confirms success.
2. Confirm VS Code integration
Run a quick test from the integrated terminal:
# Create a simple file
echo "console.log('Hello, Claude Code!');" > test.js

# Ask Claude Code a quick question
claude "Please improve this JavaScript file"
Troubleshooting
If you see “command not found: claude”
- Check npm’s global path:
npm config get prefix && echo $PATH - Add it to your PATH if needed:
echo 'export PATH=\"$PATH:$(npm config get prefix)/bin\"' >> ~/.bashrc && source ~/.bashrc
If API connection fails
- Check the VMware Virtual Network Editor:
- Is NAT configured correctly?
- Are DNS settings appropriate?
- If you’re behind a corporate proxy:
echo $HTTP_PROXY && echo $HTTPS_PROXY
If you encounter permission errors
It’s rare on VMware, but you can resolve issues with:
# Clear npm cache
npm cache clean --force

# Reinstall
npm uninstall -g @anthropic-ai/claude-code
npm install -g @anthropic-ai/claude-code
Performance tuning
1. Adjust VMware resources
Recommended VMware settings while using Claude Code:
- Memory: 4GB or more (8GB preferred)
- CPU: at least two cores
- Disk: SSD storage gives the best performance
2. Tuning Ubuntu
# Check system resources
htop

# Configure a swap file if needed
free -h
Confirming a successful setup
Claude Code is ready to use. Here are the reasons it worked well on VMware with Ubuntu:
Technical reasons for success:
- Simple installation: no complicated WSL options needed
- Stable networking: VMware’s virtual network functions correctly
- VS Code integration: the extension installed automatically
- Authentication: OAuth completed smoothly
Practical benefits:
- Isolation: your host OS remains untouched
- Full control: manage everything at the VM level
- Safe testing: snapshots protect your environment
- Corporate ready: you can use existing VMware infrastructure
Next steps: put it to use
Claude Code is now available. Try it out with a simple command:
# Example of creating a small project
# (After hitting Enter to get the Claude Code prompt)
Create a simple Python hello world script
Recommended first steps:
- Start with a small project
- Give Claude Code clear instructions
- Review every proposed change
- Take advantage of VMware’s benefits
This walkthrough shows that WSL isn’t required to run Claude Code on Windows. VMware provides an excellent alternative.