
MSP: Building a Custom Communication Protocol with Python
Have you ever felt that existing communication tools, while powerful, can feel like a black box?
That very frustration led me to create my own protocol—something transparent, educational, and entirely mine.
This article introduces MSP (Minokamo Secure Protocol):
Why I built it, how it works, and how you can try it yourself.
Why Create a Custom Protocol?
While tools like HTTP and WebSocket are fantastic, they’re also too complete.
There’s little room left to explore or customize their internals.
I wanted to go back to basics.
To build something minimal, transparent, and capable of expressing ideas that traditional protocols didn’t quite support.
MSP is built on TCP and intentionally keeps its packet structure simple—making it ideal for learning and experimentation.
MSP Packet Structure
Here’s how a typical MSP packet is organized:
- SYNC (2 bytes): Start indicator (0xAA55)
- LENGTH (2 bytes): Total length of the packet (header + payload)
- VERSION (1 byte): Protocol version
- TYPE (1 byte): Message type (e.g., data or acknowledgment)
- PAYLOAD (variable): UTF-8 encoded message body
- CRC (1 byte): A simple checksum (sum of payload bytes % 256)
This layout offers two advantages:
- If transmission is disrupted, SYNC helps realign the stream.
- CRC provides basic corruption detection.
Client-Server Communication Flow
Communication in MSP is straightforward:
- The client sends a message
- The server replies with an ACK (acknowledgment packet)
Under the hood, this is handled via Python sockets and binary data.
Two core functions take care of the packet workflow:
build_packet()– constructs a packet on the sender sideparse_packet()– interprets received packets on the receiver side
Getting Started with MSP
MSP is lightweight and dependency-free.
All functionality is contained in a single file: msp.py.
To start the server:
python msp.py --mode server --host 127.0.0.1 --port 9009
To send a message from the client:
python msp.py --mode client --host 127.0.0.1 --port 9009 --message "Hello MSP"If everything works, you’ll receive an ACK response—confirming successful transmission.
Testing Across Machines (Linux to Windows)
I also tested MSP between different OS environments.
On a Linux client:
python3 msp.py --mode client --host 192.168.0.15 --port 9009 --message "Hello MSP"(Replace 192.168.0.15 with the actual IP of your Windows server)
On the Windows server:
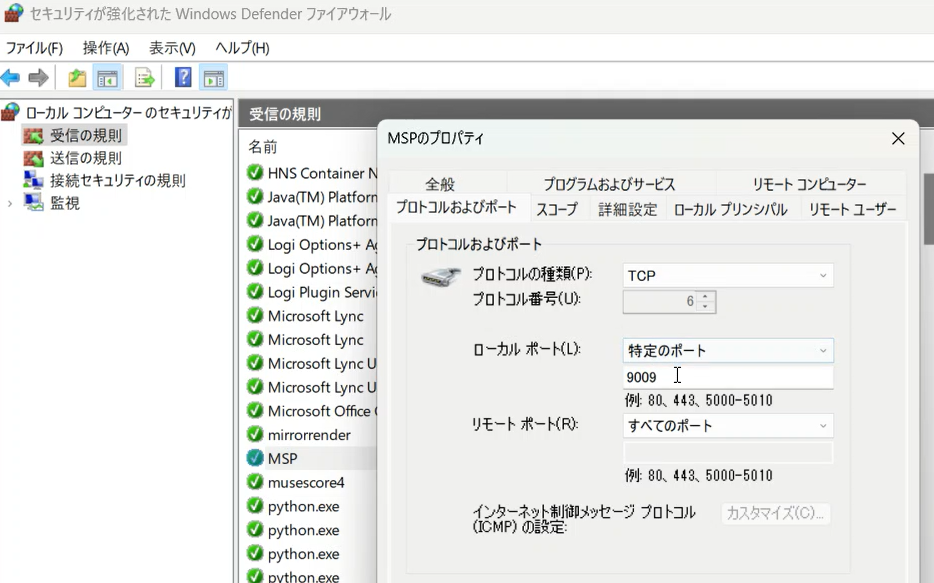
python msp.py --mode server --host 0.0.0.0 --port 9009Note: Don’t forget to configure the Windows Firewall to allow incoming TCP traffic on port 9009.
Add a rule for TCP, local port 9009, and allow connection under “Private” or “Domain” profiles.
A typical rule configuration would be:
- Protocol type: TCP
- Local port: 9009
- Action: Allow the connection
- Profile: Private or Domain (adjust based on your network)
What’s Next? Future Ideas for MSP
Since MSP is custom-built, the possibilities are wide open.
Here’s what I plan for upcoming versions:
- Add AES encryption for secure communication (planned for v0.2)
- Build a Tkinter GUI to make testing more visual
- Support COM ports for retro computing and FreeDOS compatibility
- Extend into file transfer and remote control capabilities
See the Code and Demo
You can find the full source code and a demonstration video here:
- GitHub Repository:

Final Thoughts
MSP wasn’t built for enterprise.
It was built for understanding, for learning, and for the pure joy of creating something from scratch.
Designing your own protocol gives shape to the invisible.
And that, I believe, is the essence of programming.
I hope MSP inspires someone else to explore, learn, or create.