
Complete Guide to Converting qcow2 Format to VMDK Format for VMware
This guide provides detailed instructions on how to convert qcow2 virtual disk images used in cloud services and Linux environments to VMDK format for use in VMware environments, ensuring even beginners can successfully complete the process.
Background and Preparation
Why Conversion is Necessary
qcow2 (QEMU Copy On Write 2) format is a virtual disk format used in QEMU/KVM environments and is adopted by many Linux distributions and cloud services. VMware, on the other hand, uses VMDK (Virtual Machine Disk) format as standard and cannot directly use qcow2 files.
Changes in the Current Environment
Compared to 2021, the following improvements have been made:
- Improved QEMU for Windows Stability: Version 10.1.0 (released in August 2025) has significantly improved stability in Windows environments
- Enhanced Official Installers: The official Windows version by Stefan Weil is regularly updated, making installation easier
- Windows 11 Support: Confirmed to work without issues on Windows 11 environments
Method 1: Conversion Using qemu-img Tool (Recommended)
This is the most reliable and officially supported method.
Step 1: Download and Install QEMU for Windows
- Access the Official Website
- The latest version of QEMU is 10.1.50
- Visit https://qemu.weilnetz.de/w64/ (for 64-bit Windows)
- Download the Installer
- Click
qemu-w64-setup-20250826.exe(latest version) on the page to download - File size is approximately 172MB
- SHA-512 hash values are also provided for verifying integrity after download
- Click
- Run the Installation
- Run the downloaded installer with administrator privileges
- Select installation folder (recommended:
C:\Program Files\qemu) - Select all components and install
Step 2: Configure PATH Environment Variable (Important)
This enables qemu-img to be used from PowerShell or Command Prompt.
- Open System Properties
- Windows 11/10: Right-click Start button → System → Advanced system settings
- Or: Windows key + Pause → Advanced system settings
- Edit Environment Variables
- Advanced tab → Click “Environment Variables” button
- Select “Path” under “System variables” and click “Edit”
- Add QEMU Path
- Click “New” button
- Enter
C:\Program Files\qemu(adjust according to installation location) - Click “OK” three times to save settings
- Verify Configuration
- Open a new PowerShell or Command Prompt
- Enter
qemu-img --versionand verify that version information is displayed
Step 3: Execute the Conversion
Prepare Source File
- Place the qcow2 file in an easily accessible location (e.g.,
C:\VMs\) - Ensure the file path contains no spaces
Navigate to Working Folder in PowerShell
cd C:\VMsExecute Conversion Command
Basic conversion (recommended):
qemu-img convert -f qcow2 -O vmdk centos.qcow2 centos.vmdkOptimized conversion for VMware ESXi:
qemu-img convert -f qcow2 -O vmdk -o adapter_type=lsilogic,subformat=monolithicSparse centos.qcow2 centos.vmdkConversion with progress display (for large files):
qemu-img convert -f qcow2 -O vmdk -p centos.qcow2 centos.vmdkStep 4: Verify Conversion Results
After conversion is complete, you can verify detailed information with the following command:
qemu-img info centos.vmdk
Example output:
image: centos.vmdk
file format: vmdk
virtual size: 20 GiB (21474836480 bytes)
disk size: 1.5 GiB
Method 2: Using StarWind V2V Converter (For GUI Operation Preference)
For those who prefer not to use command-line operations, a GUI tool is recommended.
Procedure
- Download StarWind V2V Converter
- StarWind V2V Converter is completely free and easy to use
- Download from https://www.starwindsoftware.com/starwind-v2v-converter
- Installation and Launch
- Run the installer and follow the instructions to install
- Launch “StarWind V2V Converter” from the Start menu
- Execute Conversion
- Source: Local file → Select qcow2 file
- Destination: Local file → Select VMDK format
- Select settings for VMware Workstation or ESXi
- Click “Convert” button to start conversion
Troubleshooting
Common Problems and Solutions
1. qemu-img Not Recognized in PowerShell
This was a problem in the original article. The following solutions are available:
- Temporary solution: Add
.\before the command.\qemu-img convert -f qcow2 -O vmdk centos.qcow2 centos.vmdk - Permanent solution: Set the PATH environment variable correctly and restart PowerShell
2. Converted VMDK Not Recognized by VMware
For ESXi 6.0 and later, specifying adapter_type and subformat may be necessary:
qemu-img convert -f qcow2 -O vmdk -o adapter_type=lsilogic,subformat=streamOptimized,compat6 source.qcow2 destination.vmdk
3. Disk Size Becomes Too Large
Using the compression option (-c) can efficiently compress zero areas:
qemu-img convert -f qcow2 -O vmdk -c -p source.qcow2 destination.vmdk
Using in VMware
For VMware Workstation
- Launch VMware Workstation
- Select “Create a New Virtual Machine”
- Select Custom (Advanced)
- Select “Use an existing virtual disk”
- Specify the converted VMDK file
For VMware ESXi
- Open Datastore Browser in vSphere Client or Web Client
- Upload VMDK file
- Select “Use an existing disk” when creating a new virtual machine
Performance Optimization Tips
Optimization Options During Conversion
Thin provisioning (recommended):
qemu-img convert -f qcow2 -O vmdk -o subformat=twoGbMaxExtentSparse source.qcow2 destination.vmdk
Fixed-size disk (performance priority):
qemu-img convert -f qcow2 -O vmdk -o subformat=monolithicFlat source.qcow2 destination.vmdk
Preparation Before Conversion
- Disk Optimization
- Execute
fstrim -avcommand within Linux virtual machine to free unused space - For Windows, execute disk defragmentation
- Execute
- Snapshot Consolidation
- If qcow2 file contains snapshots, consolidate them beforehand
Other Conversion Methods
Conversion via VirtualBox
If you have VirtualBox installed:
"C:\Program Files\Oracle\VirtualBox\VBoxManage.exe" convertfromraw source.qcow2 destination.vmdk --format VMDK
Online Conversion Services
While not recommended for security reasons, various online conversion services are available for small test files.
Summary
Converting from qcow2 to VMDK is straightforward when using the appropriate tools. As of the current era, the qemu-img tool is the most reliable and supports conversion between multiple formats (qcow2, qed, raw, vdi, vhd, vmdk).
Key points:
- Use the latest version of QEMU for Windows
- Set the PATH environment variable correctly
- Select appropriate options according to VMware type (Workstation/ESXi)
- Use progress display (-p) option for large files
Before performing conversion work, we recommend backing up the original qcow2 file.
The Following Article Was Published in 2021 and Is Preserved Here to Understand the Evolution
Recently, I downloaded a Linux ISO but the extension was different. It was an image for use in cloud services, so I wanted to make it usable in VMware.
First, download the conversion tool from the following site: https://cloudbase.it/qemu-img-windows/
When you extract the downloaded file, you’ll find “qemu-img.exe”. I’ll use this tool for conversion.
Launch PowerShell and convert the file by referring to the conversion command listed on the site.
First, navigate to the folder containing the tool and enter the following command:
qemu-img.exe convert centos.qcow2 -O vmdk test.vmdk
An error occurred.
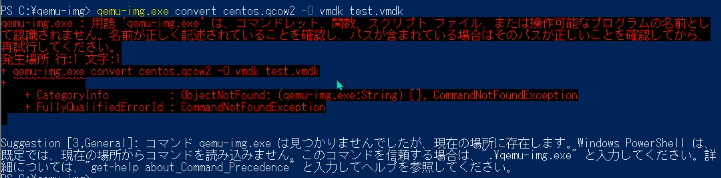
qemu-img.exe : The term 'qemu-img.exe' is not recognized as the name of a cmdlet, function, script file, or operable program. Check the spelling of the name, or if a path was included, verify that the path is correct and try again.
At line:1 char:1
+ qemu-img.exe convert centos.qcow2 -O vmdk test.vmdk
+ ~~~~
    + CategoryInfo          : ObjectNotFound: (qemu-img.exe:String) [], CommandNotFoundException
    + FullyQualifiedErrorId : CommandNotFoundException

Suggestion [3,General]: The command qemu-img.exe was not found, but does exist in the current location. Windows PowerShell does not load commands from the current location by default. If you trust this command, instead type: ".\qemu-img.exe". See "get-help about_Command_Precedence" for more details.
Based on the error content, I modified the command:
.\qemu-img.exe convert centos.qcow2 -O vmdk test.vmdk
The converted file was successfully usable in VMware.