
Introduction
With the growing availability of AI development support services like ChatGPT, Claude, and Google Gemini, even those with limited programming experience can now develop and deploy full-scale web applications. However, to operate these applications securely, proper security measures are essential.
This is where the “reverse proxy” technology comes into focus. In particular, a reverse proxy equipped with an automatic SSL/TLS certificate renewal function is an incredibly important tool for individual developers and small teams.
What is a Reverse Proxy?
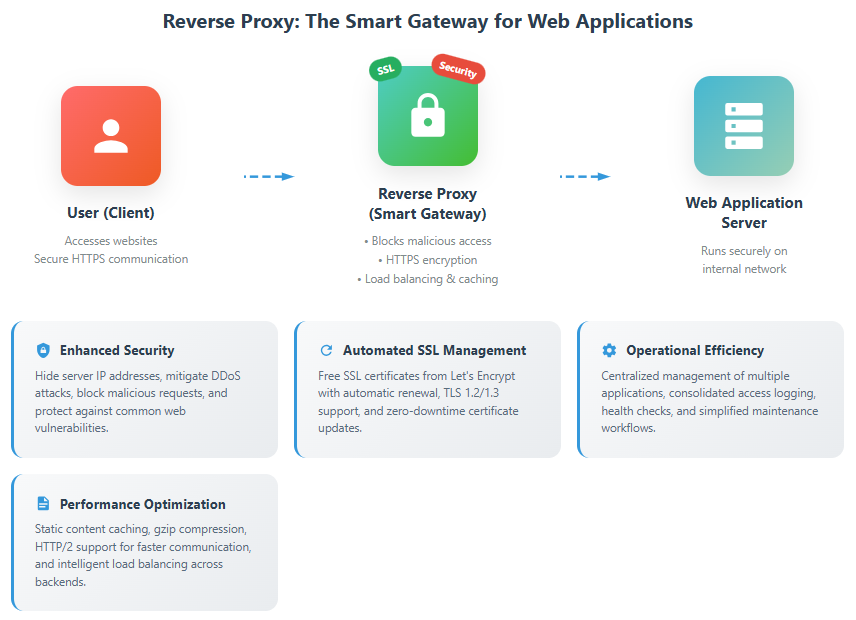
Simply put, a reverse proxy is like a “gateway server” that stands in front of your web application.
For example:
- When a user accesses a website, the gateway (reverse proxy) is the first to respond.
- The gateway can detect suspicious visitors and manage traffic congestion.
- It encrypts interactions with users (enabling HTTPS) to prevent information eavesdropping.
- It appropriately routes access to multiple applications.
Why is a Reverse Proxy Necessary?
1. Enhanced Security
- Hides the actual IP addresses and port numbers of application servers.
- Blocks unauthorized access.
- Encrypts communication with HTTPS (supporting TLS 1.2/1.3).
- Mitigates DDoS attacks.
2. Streamlined Operational Management
- Manages multiple applications under a single domain.
- Centralizes SSL certificate management (with auto-renewal).
- Centralizes access log management.
- Provides health check functionality.
3. Improved Performance
- Caches static content.
- Reduces data transfer volume with gzip compression.
- Enables high-speed communication with HTTP/2.
- Distributes load (load balancing).
What You Can Achieve with This Guide
This guide will help you build the following environment based on current best practices:
✅ Automatic renewal of free SSL certificates (using Let’s Encrypt)
✅ Modern configuration using Docker Compose V2
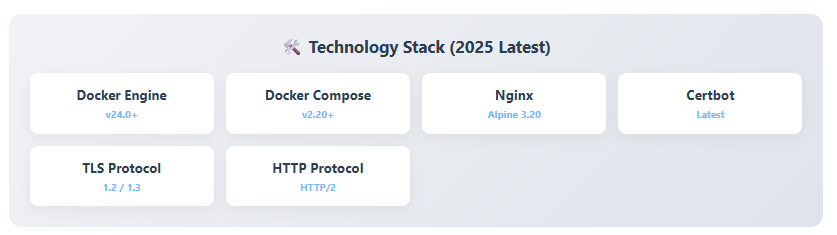
✅ Robust security with TLS 1.2/1.3
✅ Detailed step-by-step instructions that are easy for beginners to understand
✅ Comprehensive troubleshooting support
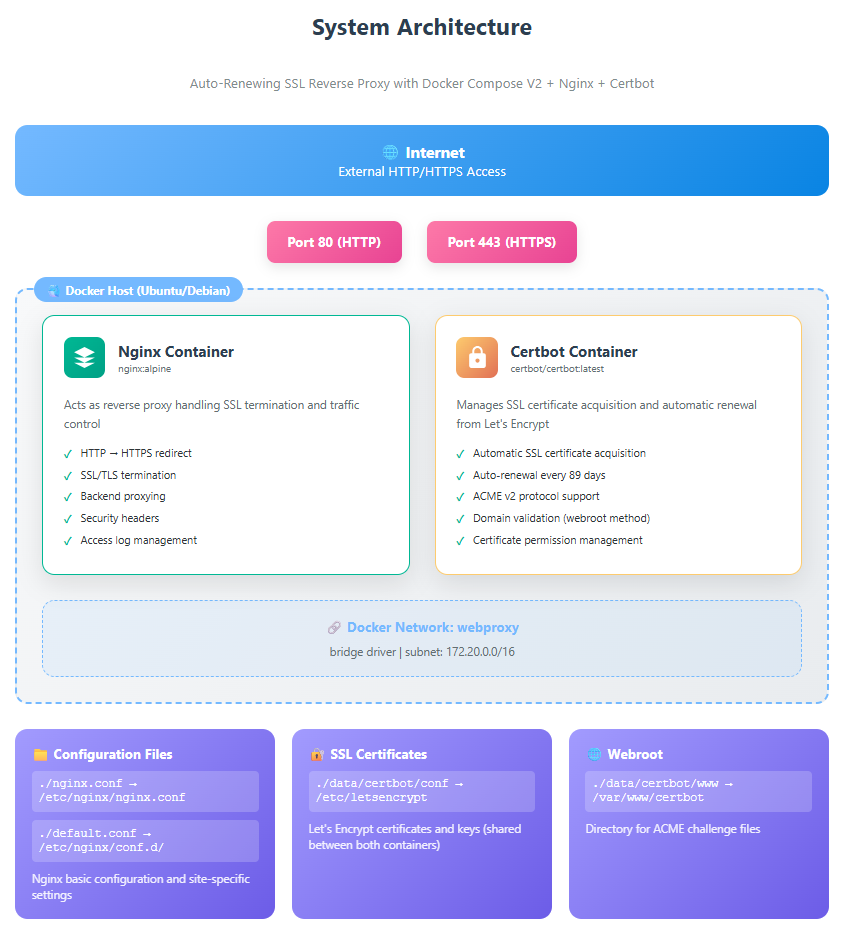
System Configuration
This project uses Docker containers to run Nginx and Certbot, creating a secure and automated web server environment.
Key Components
1. Nginx Container (Reverse Proxy)
- Receives external access and forwards it to internal application servers.
- Acts as the HTTPS endpoint (SSL/TLS termination).
- Uses a lightweight image based on Alpine Linux 3.20 (approx. 10MB).
- Achieves high-speed communication with HTTP/2 support.
2. Certbot Container (SSL Certificate Management)
- Obtains free SSL certificates from Let’s Encrypt.
- Handles automatic certificate renewal (checks every 12 hours, renewable 30 days before expiration).
- Automatically applies renewed certificates to Nginx without downtime.
- Supports the ACME v2 protocol.
Role of Configuration Files
| Filename | Role | Importance |
|---|---|---|
nginx.conf | Basic Nginx settings (worker processes, log format, etc.) | ★★★ |
default.conf | Site-specific settings (SSL config, proxy rules, etc.) | ★★★ |
docker-compose.yml | Container configuration management (Docker Compose V2 format) | ★★★ |
init-letsencrypt.sh | Initial setup script | ★★★ |
.env | Environment variables (domain name, email address, etc.) | ★★☆ |
Security Measures
This system incorporates the following security features:
1. Communication Encryption
# Use only TLS 1.2 and 1.3 (older protocols are disabled)
ssl_protocols TLSv1.2 TLSv1.3;

# Latest cipher suites
ssl_ciphers 'ECDHE-ECDSA-AES128-GCM-SHA256:ECDHE-RSA-AES128-GCM-SHA256:ECDHE-ECDSA-AES256-GCM-SHA384:ECDHE-RSA-AES256-GCM-SHA384';

# Ensure Perfect Forward Secrecy
ssl_prefer_server_ciphers off;
2. HTTP Security Headers
# HSTS (HTTP Strict Transport Security)
add_header Strict-Transport-Security "max-age=63072000; includeSubDomains; preload" always;

# Other security headers
add_header X-Frame-Options "SAMEORIGIN" always;
add_header X-Content-Type-Options "nosniff" always;
add_header X-XSS-Protection "1; mode=block" always;
3. Automated Certificate Management
- Automatically monitors SSL certificate expiration.
- Starts auto-renewal 30 days before expiration.
- Auto-retry feature on renewal failure.
- Manages certificate permissions (protected with 600 permissions).
4. Access Control
- Automatic redirection from HTTP to HTTPS (301 Permanent Redirect).
- Rate limiting feature (DDoS protection).
- IP address-based access restriction (optional).
Prerequisites and Environment Setup
Required Environment
Before you begin the setup, please ensure you have the following environment:
1. Server Requirements
- OS: Ubuntu 22.04 LTS / Debian 12 / CentOS 9 / Rocky Linux 9, etc.
- Memory: Minimum 512MB (1GB or more recommended).
- Storage: Minimum 10GB (including space for log files).
- CPU: 1 core or more.
2. Required Software
- Docker Engine: v24.0 or higher (latest stable version recommended).
- Docker Compose: v2.20 or higher (plugin version).
3. Network Requirements
- Public IP Address (a fixed IP is desirable).
- Ports 80 and 443 must be open.
- Firewall settings must be configured appropriately.
4. Domain Requirements
- A custom domain (e.g., example.com).
- The domain’s A record must point to the server’s IP address.
Installing Docker and Docker Compose
For Ubuntu/Debian:
# 1. Install required packages
sudo apt-get update
sudo apt-get install -y ca-certificates curl gnupg

# 2. Add Docker's official GPG key
sudo install -m 0755 -d /etc/apt/keyrings
curl -fsSL https://download.docker.com/linux/ubuntu/gpg | sudo gpg --dearmor -o /etc/apt/keyrings/docker.gpg
sudo chmod a+r /etc/apt/keyrings/docker.gpg

# 3. Set up the Docker repository
echo \
  "deb [arch=$(dpkg --print-architecture) signed-by=/etc/apt/keyrings/docker.gpg] https://download.docker.com/linux/ubuntu \
  $(. /etc/os-release && echo "$VERSION_CODENAME") stable" | \
  sudo tee /etc/apt/sources.list.d/docker.list > /dev/null

# 4. Install Docker Engine
sudo apt-get update
sudo apt-get install -y docker-ce docker-ce-cli containerd.io docker-buildx-plugin docker-compose-plugin

# 5. Verify the installation
docker --version
docker compose version  # Note the space in "docker compose"!
Add the current user to the docker group (to run without sudo):
sudo usermod -aG docker $USER
# Log out and back in to apply the changes
newgrp docker
Verifying DNS Settings
Check if your domain correctly points to your server:
# Check the A record
dig +short your-domain.com

# Or
nslookup your-domain.com
If your server’s IP address is displayed, the setting is correct.
Detailed Explanation of Key Files
docker-compose.yml (Docker Compose V2 format)
# Compliant with Docker Compose V2 specification
services:  # 'version' is no longer needed (since v2.20)
  nginx-proxy:
    image: nginx:alpine
    container_name: nginx-proxy
    restart: unless-stopped  # Auto-restart setting
    ports:
      - "80:80"
      - "443:443"
    volumes:
      # Nginx configuration files
      - ./nginx.conf:/etc/nginx/nginx.conf:ro
      - ./default.conf:/etc/nginx/conf.d/default.conf:ro
      # SSL certificates (shared with Certbot)
      - ./data/certbot/conf:/etc/letsencrypt:ro
      - ./data/certbot/www:/var/www/certbot:ro
    networks:
      - webproxy
    depends_on:
      - certbot
    # Auto-reload Nginx on certificate renewal
    command: "/bin/sh -c 'while :; do sleep 6h & wait $${!}; nginx -s reload; done & nginx -g \"daemon off;\"'"

  certbot:
    image: certbot/certbot:latest
    container_name: certbot
    restart: unless-stopped
    volumes:
      - ./data/certbot/conf:/etc/letsencrypt:rw
      - ./data/certbot/www:/var/www/certbot:rw
    networks:
      - webproxy
    # Auto-renewal setting (every 89 days = Let's Encrypt's recommended interval)
    entrypoint: "/bin/sh -c 'trap exit TERM; while :; do certbot renew; sleep 89d & wait $${!}; done;'"

networks:
  webproxy:
    driver: bridge
    ipam:
      config:
        - subnet: 172.20.0.0/16
default.conf (Nginx Configuration File)
# HTTP server settings (port 80)
server {
    listen 80;
    listen [::]:80;  # IPv6 support

    server_name example.com www.example.com;

    # For Let's Encrypt challenge files
    location /.well-known/acme-challenge/ {
        root /var/www/certbot;
    }

    # Redirect all other requests to HTTPS
    location / {
        return 301 https://$host$request_uri;
    }
}

# HTTPS server settings (port 443)
server {
    listen 443 ssl http2;
    listen [::]:443 ssl http2;  # IPv6 support

    server_name example.com www.example.com;

    # SSL certificate settings
    ssl_certificate /etc/letsencrypt/live/example.com/fullchain.pem;
    ssl_certificate_key /etc/letsencrypt/live/example.com/privkey.pem;

    # SSL settings
    ssl_session_timeout 1d;
    ssl_session_cache shared:SSL:10m;
    ssl_session_tickets off;

    # TLS versions (only 1.2 and 1.3)
    ssl_protocols TLSv1.2 TLSv1.3;

    # Cipher suites (recommended settings)
    ssl_ciphers ECDHE-ECDSA-AES128-GCM-SHA256:ECDHE-RSA-AES128-GCM-SHA256:ECDHE-ECDSA-AES256-GCM-SHA384:ECDHE-RSA-AES256-GCM-SHA384:ECDHE-ECDSA-CHACHA20-POLY1305:ECDHE-RSA-CHACHA20-POLY1305:DHE-RSA-AES128-GCM-SHA256:DHE-RSA-AES256-GCM-SHA384;
    ssl_prefer_server_ciphers off;

    # OCSP Stapling (speeds up certificate validity checks)
    ssl_stapling on;
    ssl_stapling_verify on;
    ssl_trusted_certificate /etc/letsencrypt/live/example.com/chain.pem;

    # Security headers
    add_header Strict-Transport-Security "max-age=63072000" always;
    add_header X-Frame-Options "SAMEORIGIN" always;
    add_header X-Content-Type-Options "nosniff" always;

    # Proxy settings for the backend server
    location / {
        proxy_pass http://10.0.0.37:8080;  # Backend server address

        # Proxy header settings
        proxy_set_header Host $host;
        proxy_set_header X-Real-IP $remote_addr;
        proxy_set_header X-Forwarded-For $proxy_add_x_forwarded_for;
        proxy_set_header X-Forwarded-Proto $scheme;

        # WebSocket support (if needed)
        proxy_http_version 1.1;
        proxy_set_header Upgrade $http_upgrade;
        proxy_set_header Connection "upgrade";

        # Timeout settings
        proxy_connect_timeout 60s;
        proxy_send_timeout 60s;
        proxy_read_timeout 60s;
    }
}
nginx.conf (Basic Nginx Configuration)
user nginx;
worker_processes auto;  # Auto-adjust based on CPU cores
error_log /var/log/nginx/error.log warn;
pid /var/run/nginx.pid;

events {
    worker_connections 1024;  # Number of simultaneous connections
    use epoll;  # High-performance event model for Linux
    multi_accept on;
}

http {
    include /etc/nginx/mime.types;
    default_type application/octet-stream;

    # Log format
    log_format main '$remote_addr - $remote_user [$time_local] "$request" '
                    '$status $body_bytes_sent "$http_referer" '
                    '"$http_user_agent" "$http_x_forwarded_for"';

    access_log /var/log/nginx/access.log main;

    # Performance settings
    sendfile on;
    tcp_nopush on;
    tcp_nodelay on;
    keepalive_timeout 65;
    types_hash_max_size 2048;
    client_max_body_size 100M;  # Upload size limit

    # Gzip compression
    gzip on;
    gzip_vary on;
    gzip_min_length 1024;
    gzip_types text/plain text/css text/xml text/javascript application/json application/javascript application/xml+rss application/rss+xml application/atom+xml image/svg+xml text/x-js text/x-cross-domain-policy application/x-font-ttf application/x-font-opentype application/vnd.ms-fontobject image/x-icon;

    # Security settings
    server_tokens off;  # Hide Nginx version

    # Include site-specific configurations
    include /etc/nginx/conf.d/*.conf;
}
init-letsencrypt.sh (Initial Setup Script)
#!/bin/bash

# Variables for color output
RED='\033[0;31m'
GREEN='\033[0;32m'
YELLOW='\033[1;33m'
NC='\033[0m' # No Color

# Configuration variables (change according to your environment)
domains=(example.com www.example.com)  # Domain names (multiple allowed)
rsa_key_size=4096  # RSA key size
data_path="./data/certbot"
email="admin@example.com"  # Email for Let's Encrypt notifications
staging=1  # 1=test mode, 0=production mode

# Check for Docker Compose
if ! [ -x "$(command -v docker)" ]; then
  echo -e "${RED}Error: Docker is not installed.${NC}" >&2
  exit 1
fi

if ! docker compose version >/dev/null 2>&1; then
  echo -e "${RED}Error: Docker Compose V2 is not installed.${NC}" >&2
  exit 1
fi

# Check for existing data
if [ -d "$data_path" ]; then
  read -p "Existing data found. Continue? (y/N) " decision
  if [ "$decision" != "Y" ] && [ "$decision" != "y" ]; then
    exit
  fi
fi

# Create a dummy certificate (for starting Nginx)
echo -e "${GREEN}### Creating dummy certificate...${NC}"
path="/etc/letsencrypt/live/${domains[0]}"
mkdir -p "$data_path/conf/live/${domains[0]}"
docker compose run --rm --entrypoint "\
  openssl req -x509 -nodes -newkey rsa:$rsa_key_size -days 1\
    -keyout '$path/privkey.pem' \
    -out '$path/fullchain.pem' \
    -subj '/CN=localhost'" certbot
echo

# Start Nginx
echo -e "${GREEN}### Starting Nginx...${NC}"
docker compose up --force-recreate -d nginx-proxy
echo

# Delete the dummy certificate
echo -e "${GREEN}### Deleting dummy certificate...${NC}"
docker compose run --rm --entrypoint "\
  rm -Rf /etc/letsencrypt/live/${domains[0]} && \
  rm -Rf /etc/letsencrypt/archive/${domains[0]} && \
  rm -Rf /etc/letsencrypt/renewal/${domains[0]}.conf" certbot
echo

# Obtain Let's Encrypt certificate
echo -e "${GREEN}### Obtaining Let's Encrypt certificate...${NC}"
domain_args=""
for domain in "${domains[@]}"; do
  domain_args="$domain_args -d $domain"
done

# Set email address
case "$email" in
  "") email_arg="--register-unsafely-without-email" ;;
  *) email_arg="--email $email" ;;
esac

# Set staging environment
if [ $staging != "0" ]; then
  staging_arg="--staging"
  echo -e "${YELLOW}Note: Running in test mode.${NC}"
fi

# Obtain the certificate
docker compose run --rm --entrypoint "\
  certbot certonly --webroot -w /var/www/certbot \
    $staging_arg \
    $email_arg \
    $domain_args \
    --rsa-key-size $rsa_key_size \
    --agree-tos \
    --force-renewal" certbot
echo

# Restart Nginx
echo -e "${GREEN}### Restarting Nginx...${NC}"
docker compose restart nginx-proxy

echo -e "${GREEN}### Setup complete!${NC}"
if [ $staging != "0" ]; then
  echo -e "${YELLOW}To switch to production, change staging=0 and re-run the script.${NC}"
fi
Setup Steps (Detailed Version for Beginners)
Step 1: Download the Project
# Clone the project from GitHub
git clone https://github.com/superdoccimo/rev.git
cd rev

# Or, if creating files individually
mkdir nginx-letsencrypt
cd nginx-letsencrypt
Step 2: Create the Environment Variables File
Create a .env file to describe your environment-specific settings:
# Create the .env file
cat > .env << EOF
# Domain settings
DOMAIN=example.com
WWW_DOMAIN=www.example.com

# Let's Encrypt settings
LETSENCRYPT_EMAIL=admin@example.com

# Backend server settings
BACKEND_HOST=10.0.0.37
BACKEND_PORT=8080

# Environment settings (staging/production)
ENVIRONMENT=staging
EOF
Step 3: Customize Configuration Files
3.1 Change Domain Name
Edit the default.conf file:
# Bulk replace with sed (example)
sed -i 's/example.com/your-domain.com/g' default.conf

# Or, edit with a text editor
nano default.conf
3.2 Configure the Backend Server
Edit the proxy_pass line in default.conf:
# Example 1: For a local Docker container
proxy_pass http://app-container:3000;

# Example 2: For a different server
proxy_pass http://192.168.1.100:8080;

# Example 3: For a Unix socket
proxy_pass http://unix:/var/run/app.sock;
Step 4: Run in Test Mode
Before running in production, always verify the setup in test mode:
# Grant execution permission
chmod +x init-letsencrypt.sh

# Run in test mode (staging=1)
sudo ./init-letsencrypt.sh
Verification Points:
- ✅ Check for any error messages.
- ✅ Ensure the Nginx container is running correctly.
- ✅ Check if you can access the site via port 80.
# Check container status
docker compose ps

# Check logs
docker compose logs nginx-proxy
docker compose logs certbot
Step 5: Verify Operation
Check access in your browser:
# Check HTTP access
curl -I http://your-domain.com

# Check for HTTPS redirect (a 301 response is OK)
# It's normal to get a certificate error in test mode.
Step 6: Switch to Production Mode
Once the test is successful, obtain the production certificate:
# Edit init-letsencrypt.sh
nano init-letsencrypt.sh

# Change staging=1 to staging=0
staging=0

# Delete existing certificate data (important!)
sudo rm -rf ./data/certbot/conf/*

# Run in production mode
sudo ./init-letsencrypt.sh
Step 7: Verify SSL Certificate
# Check SSL certificate details
openssl s_client -connect your-domain.com:443 -servername your-domain.com < /dev/null

# Check certificate expiration date
docker compose exec nginx-proxy openssl x509 -in /etc/letsencrypt/live/your-domain.com/cert.pem -text -noout | grep "Not After"
Troubleshooting (Common Problems and Solutions)
Problem 1: Certificate Acquisition Fails
Symptom:
Challenge failed for domain example.com
Cause and Solution:
1. DNS Configuration Error
# Check DNS
dig +short your-domain.com
# Verify that the server's IP address is displayed.

# Wait for DNS propagation (can take up to 48 hours).
2. Firewall Settings
# Check if ports 80 and 443 are open
sudo ufw status
sudo ufw allow 80/tcp
sudo ufw allow 443/tcp
3. Another Process is Already Using the Ports
# Check port usage
sudo lsof -i :80
sudo lsof -i :443

# Stop existing services if necessary
sudo systemctl stop apache2  # For Apache
sudo systemctl stop nginx    # For system's Nginx
Problem 2: Nginx Fails to Start
Symptom:
nginx-proxy exited with code 1
Solution:
Check Configuration File Syntax
# Test Nginx configuration
docker compose exec nginx-proxy nginx -t

# If an error occurs, correct the corresponding line.
Problem 3: Automatic Certificate Renewal Fails
Symptom:
The certificate is not renewed even as the expiration date approaches.
Solution:
Test Renewal Manually
# Perform a dry run of the renewal
docker compose exec certbot certbot renew --dry-run

# Actually renew
docker compose exec certbot certbot renew --force-renewal

# Restart Nginx to apply the certificate
docker compose restart nginx-proxy
Problem 4: Cannot Access via HTTPS
Symptom:
ERR_SSL_PROTOCOL_ERROR
Solution:
Verify Certificate Path
# Check if the certificate file exists
ls -la ./data/certbot/conf/live/your-domain/

# Check and correct permissions
sudo chmod -R 755 ./data/certbot/conf/
Problem 5: Let’s Encrypt Rate Limits
Symptom:
Error creating new order :: too many certificates already issued
Solution:
- Certificate issuance for the same domain is limited to 5 times per week.
- Use the staging environment for testing.
- Wait one week before retrying.
Customization Methods
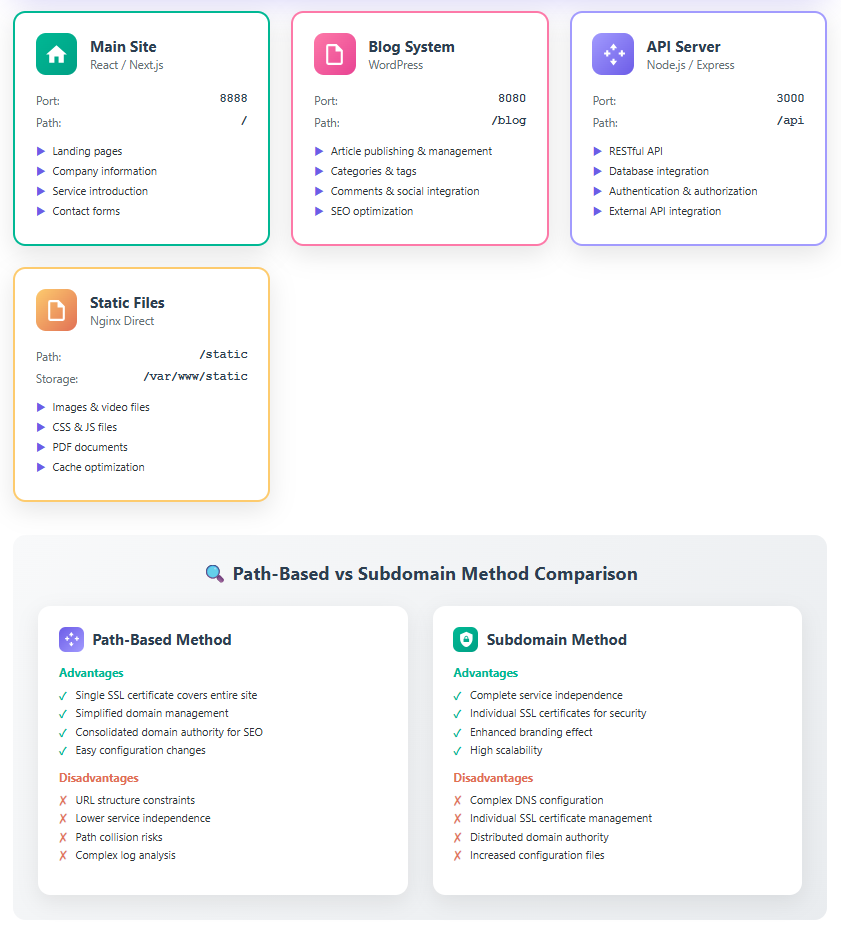
Operating Multiple Sites
A major advantage of a reverse proxy is the ability to manage multiple websites centrally.
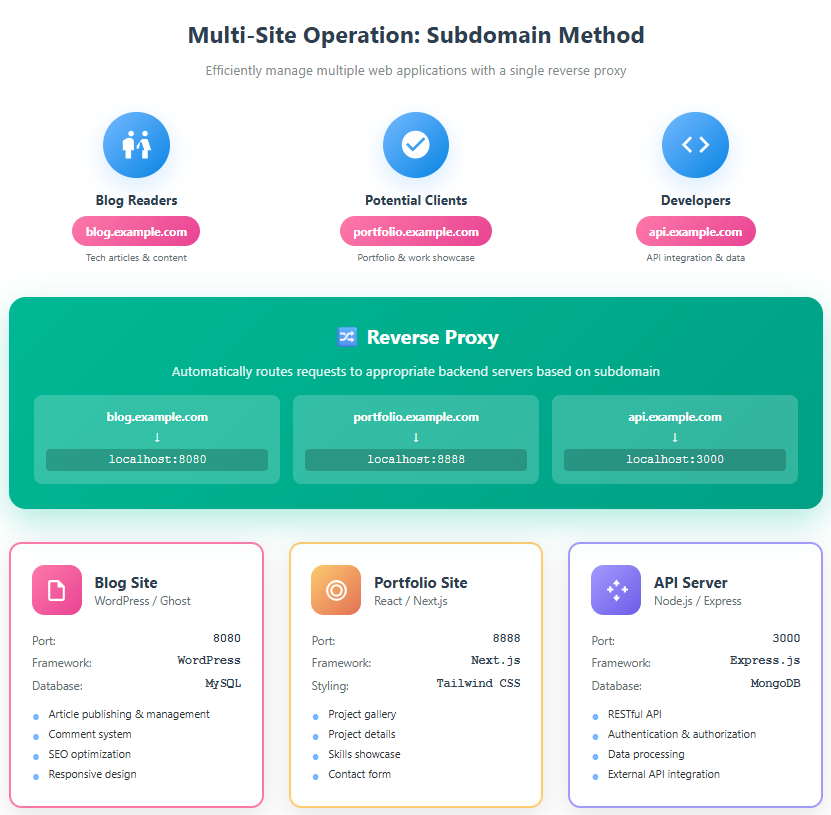

Configuration Example 1: Subdomain-based Routing
# Settings for blog.example.com
server {
    listen 443 ssl http2;
    server_name blog.example.com;

    ssl_certificate /etc/letsencrypt/live/blog.example.com/fullchain.pem;
    ssl_certificate_key /etc/letsencrypt/live/blog.example.com/privkey.pem;

    location / {
        proxy_pass http://localhost:8080;  # WordPress container
    }
}

# Settings for portfolio.example.com
server {
    listen 443 ssl http2;
    server_name portfolio.example.com;

    ssl_certificate /etc/letsencrypt/live/portfolio.example.com/fullchain.pem;
    ssl_certificate_key /etc/letsencrypt/live/portfolio.example.com/privkey.pem;

    location / {
        proxy_pass http://localhost:8888;  # Portfolio site
    }
}
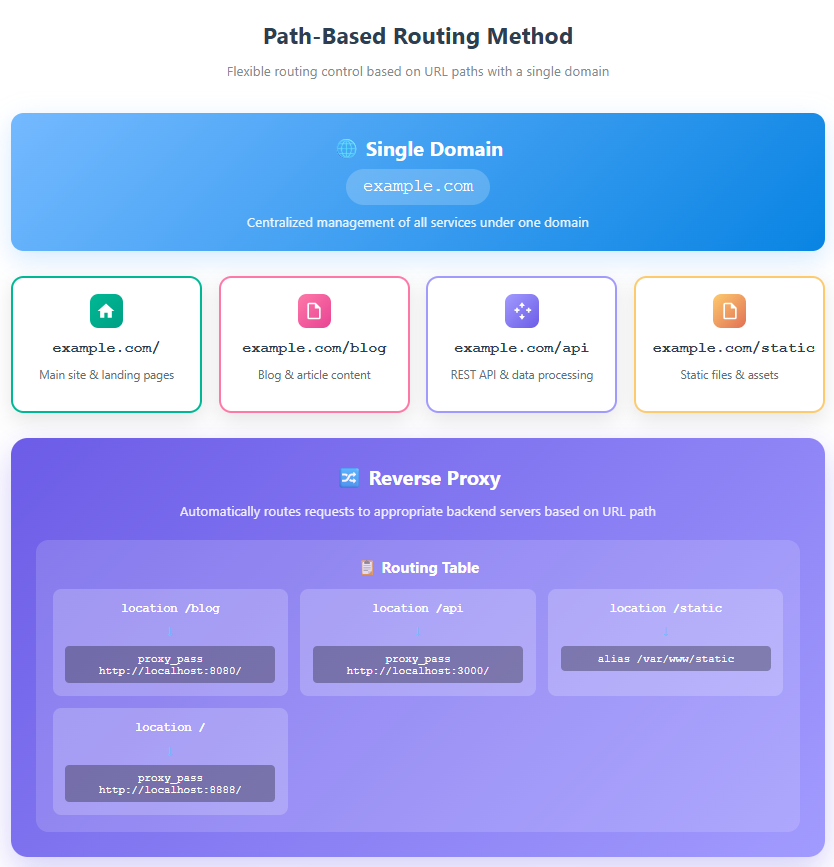
Configuration Example 2: Path-based Routing
server {
    listen 443 ssl http2;
    server_name example.com;

    # For the blog
    location /blog {
        proxy_pass http://localhost:8080/;
        proxy_set_header Host $host;
        proxy_set_header X-Real-IP $remote_addr;
    }

    # For the API
    location /api {
        proxy_pass http://localhost:3000/;
        proxy_set_header Host $host;
        proxy_set_header X-Real-IP $remote_addr;
    }

    # For static files
    location /static {
        alias /var/www/static;
        expires 30d;
        add_header Cache-Control "public, immutable";
    }
}
Performance Tuning
1. Cache Settings
# Proxy cache settings
proxy_cache_path /var/cache/nginx levels=1:2 keys_zone=my_cache:10m max_size=1g inactive=60m use_temp_path=off;

server {
    location / {
        proxy_cache my_cache;
        proxy_cache_valid 200 60m;
        proxy_cache_valid 404 1m;
        proxy_cache_bypass $http_pragma $http_authorization;

        add_header X-Cache-Status $upstream_cache_status;
        proxy_pass http://backend;
    }
}
2. Compression Optimization
# Add Brotli compression (higher compression ratio)
load_module modules/ngx_http_brotli_module.so;

http {
    # Brotli settings
    brotli on;
    brotli_comp_level 6;
    brotli_types text/plain text/css text/xml text/javascript application/json application/javascript application/xml+rss application/rss+xml application/atom+xml image/svg+xml;
}
Security Enhancement
1. Implementing Rate Limiting
# Rate limiting for DDoS protection
limit_req_zone $binary_remote_addr zone=mylimit:10m rate=10r/s;

server {
    location /api {
        limit_req zone=mylimit burst=20 nodelay;
        proxy_pass http://backend;
    }
}
2. IP Address Restriction
# Access restriction for the admin panel
location /admin {
    allow 192.168.1.0/24;  # Internal network
    allow 203.0.113.5;     # Administrator's fixed IP
    deny all;

    proxy_pass http://backend;
}
Advanced Docker Compose Settings
1. Adding Health Checks
services:
  nginx-proxy:
    image: nginx:alpine
    healthcheck:
      test: ["CMD", "curl", "-f", "http://localhost/health"]
      interval: 30s
      timeout: 10s
      retries: 3
      start_period: 40s
2. Resource Limits
services:
  nginx-proxy:
    image: nginx:alpine
    deploy:
      resources:
        limits:
          cpus: '0.5'
          memory: 512M
        reservations:
          cpus: '0.25'
          memory: 256M
Automation and Maintenance
Automatic Certificate Renewal Settings
Let’s Encrypt certificates expire in 90 days, so automatic renewal is crucial.
Method Using systemd Timers (Recommended)
# 1. Create a systemd service file
sudo cat > /etc/systemd/system/certbot-renewal.service << EOF
[Unit]
Description=Certbot Renewal
After=docker.service
Requires=docker.service

[Service]
Type=oneshot
WorkingDirectory=/path/to/your/project
ExecStart=/usr/bin/docker compose exec -T certbot certbot renew --quiet
ExecStartPost=/usr/bin/docker compose exec -T nginx-proxy nginx -s reload

[Install]
WantedBy=multi-user.target
EOF

# 2. Create a timer file
sudo cat > /etc/systemd/system/certbot-renewal.timer << EOF
[Unit]
Description=Run Certbot Renewal twice daily

[Timer]
OnCalendar=*-*-* 00,12:00:00
RandomizedDelaySec=3600
Persistent=true

[Install]
WantedBy=timers.target
EOF

# 3. Enable and start the service
sudo systemctl daemon-reload
sudo systemctl enable certbot-renewal.timer
sudo systemctl start certbot-renewal.timer

# 4. Check status
sudo systemctl status certbot-renewal.timer
sudo systemctl list-timers
Log Management
Log Rotation Settings
# Create /etc/logrotate.d/nginx-docker
sudo cat > /etc/logrotate.d/nginx-docker << EOF
/var/lib/docker/containers/*/*.log {
    daily
    rotate 7
    compress
    delaycompress
    missingok
    notifempty
    create 0640 root root
    sharedscripts
    postrotate
        docker compose exec -T nginx-proxy nginx -s reopen
    endscript
}
EOF
Monitoring Settings
1. Certificate Expiration Monitoring Script
#!/bin/bash
# check-cert-expiry.sh

DOMAIN="example.com"
DAYS_WARNING=30

expiry_date=$(docker compose exec -T nginx-proxy \
    openssl x509 -in /etc/letsencrypt/live/$DOMAIN/cert.pem -noout -enddate \
    | cut -d= -f2)

expiry_epoch=$(date -d "$expiry_date" +%s)
current_epoch=$(date +%s)
days_left=$(( ($expiry_epoch - $current_epoch) / 86400 ))

if [ $days_left -lt $DAYS_WARNING ]; then
    echo "Warning: SSL certificate expires in ${days_left} days!"
    # Send email or Slack notification
fi
2. Health Check Integration with Docker Compose
services:
  monitoring:
    image: prom/prometheus:latest
    volumes:
      - ./prometheus.yml:/etc/prometheus/prometheus.yml
    ports:
      - "9090:9090"
    networks:
      - webproxy
Best Practices and Security Recommendations
Security Recommendations
1. TLS Settings Optimization
# Recommended TLS settings
ssl_protocols TLSv1.2 TLSv1.3;
ssl_ciphers 'TLS_AES_128_GCM_SHA256:TLS_AES_256_GCM_SHA384:TLS_CHACHA20_POLY1305_SHA256:ECDHE-RSA-AES128-GCM-SHA256:ECDHE-RSA-AES256-GCM-SHA384';
ssl_prefer_server_ciphers off;
ssl_session_cache shared:SSL:10m;
ssl_session_timeout 1d;
ssl_session_tickets off;
2. Complete Security Headers
# Security Headers
add_header Strict-Transport-Security "max-age=63072000; includeSubDomains; preload" always;
add_header X-Frame-Options "SAMEORIGIN" always;
add_header X-Content-Type-Options "nosniff" always;
add_header X-XSS-Protection "1; mode=block" always;
add_header Referrer-Policy "strict-origin-when-cross-origin" always;
add_header Content-Security-Policy "default-src 'self' https:; script-src 'self' 'unsafe-inline' 'unsafe-eval' https:; style-src 'self' 'unsafe-inline' https:;" always;
add_header Permissions-Policy "geolocation=(), microphone=(), camera=()" always;
Performance Optimization
1. HTTP/2 and HTTP/3 Settings
# Enable HTTP/2 (already included by default)
listen 443 ssl http2;

# Enable HTTP/3 (QUIC) (Nginx 1.25.0+)
listen 443 quic reuseport;
listen 443 ssl http2;
add_header Alt-Svc 'h3=":443"; ma=86400';
2. Connection Optimization
# Keep-alive connection optimization
keepalive_timeout 65;
keepalive_requests 100;

# Buffer size optimization
client_body_buffer_size 128k;
client_max_body_size 100m;
client_header_buffer_size 1k;
large_client_header_buffers 4 4k;
output_buffers 1 32k;
postpone_output 1460;
Monitoring and Alerts
Monitoring with Prometheus + Grafana
# Add to docker-compose.yml
services:
  nginx-exporter:
    image: nginx/nginx-prometheus-exporter:latest
    ports:
      - "9113:9113"
    command:
      - -nginx.scrape-uri=http://nginx-proxy/nginx_status
    networks:
      - webproxy
    depends_on:
      - nginx-proxy
Frequently Asked Questions (FAQ)
Q1: Is a free Let’s Encrypt certificate sufficient?
A: Yes, in most cases, it is sufficient. Let’s Encrypt:
- Is trusted by all major browsers.
- Is easy to manage with automatic renewal.
- Functions as a DV (Domain Validated) certificate.
However, consider a paid certificate if:
- You need an EV (Extended Validation) certificate.
- You need to manage many subdomains with a wildcard certificate.
- You require legal indemnification.
Q2: What happens if certificate renewal fails?
A: Automatic renewal is attempted 30 days before expiration, so there are multiple retry opportunities. Manual steps:
# Check renewal status
docker compose exec certbot certbot certificates

# Manual renewal
docker compose exec certbot certbot renew --force-renewal

# Restart Nginx
docker compose restart nginx-proxy
Q3: Can I use one certificate for multiple domains?
A: Yes, this is possible with a SAN (Subject Alternative Names) certificate:
# Specify multiple domains in init-letsencrypt.sh
domains=(example.com www.example.com api.example.com)
Q4: How should I back up my setup?
A: You should back up the following directories:
# Example backup script
#!/bin/bash
BACKUP_DIR="/backup/nginx-letsencrypt"
DATE=$(date +%Y%m%d_%H%M%S)

# Backup certificates
tar -czf $BACKUP_DIR/certbot_$DATE.tar.gz ./data/certbot/

# Backup configuration files
tar -czf $BACKUP_DIR/config_$DATE.tar.gz *.conf docker-compose.yml

# Delete old backups (older than 30 days)
find $BACKUP_DIR -name "*.tar.gz" -mtime +30 -delete
Q5: What should I do if performance is slow?
A: Check the following points:
Check for resource shortages
docker stats
htop
Adjust Nginx worker processes
worker_processes auto; # Auto-adjusts to the number of CPU coresworker_processes auto; # Auto-adjusts to the number of CPU cores
Enable caching
Reduce unnecessary logging
Conclusion
This guide has provided a detailed explanation of how to build an auto-renewing SSL reverse proxy using Docker, Nginx, and Let’s Encrypt, based on current best practices.
What We Achieved
✅ Secure Environment Construction
- Encrypted communication with TLS 1.2/1.3.
- Continuous security through automatic certificate renewal.
- Implementation of modern security headers.
✅ Operational Automation
- Easy management with Docker Compose V2.
- Automatic renewal with Let’s Encrypt.
- Automated log rotation.
✅ Scalable Configuration
- Centralized management of multiple sites.
- Potential for implementing load balancing.
- Adaptable to microservices architecture.
Next Steps
To further develop this system:
- Add a monitoring system (Prometheus + Grafana).
- Build a CI/CD pipeline (e.g., GitHub Actions).
- Migrate to a Kubernetes environment (for larger-scale operations).
- Introduce a WAF (Web Application Firewall) (e.g., ModSecurity).
Related Resources
- Nginx Official Documentation
- Let’s Encrypt Official Website
- Docker Official Documentation
- GitHub Repository
Related Articles
Articles related to reverse proxies:
Tutorial video:
Last Updated: September 2025 Version: 2.0 Author: mamu minokamo
If you found this article helpful, please consider starring it on GitHub! If you have questions or suggestions for improvement, please let me know via a GitHub Issue.