
First, let’s confirm whether it’s appropriate to delete Windows and install Ubuntu for AI inference tasks.
1. Is Installing Ubuntu on the EVO-X2 the Right Decision?
For maximizing the capabilities of cutting-edge hardware, especially processors equipped with AI accelerators (NPUs), Ubuntu (Linux) offers significant advantages.
- AI Development Ecosystem: Major machine learning frameworks like TensorFlow, PyTorch, and JAX, along with inference acceleration libraries (such as ONNX Runtime), are primarily developed and tested in Linux environments. Environment setup using Docker is also much smoother and higher-performing natively on Linux.
- Early Driver Releases: AMD actively provides drivers for their “ROCm” platform (for using AMD GPUs in AI computing) and new NPU drivers primarily for Linux. While Windows versions are also released, cutting-edge features and optimizations often arrive on Linux first.
- Performance and Transparency: The OS itself is lightweight, and unnecessary background services can be finely controlled, making it easier to dedicate computing resources to AI tasks. Tools for tracking and managing what consumes memory and CPU are also abundant.
In short, Linux is often more suitable for extracting every ounce of potential from cutting-edge AI hardware.
2. Flexibility in Memory Management: Differences in Cache Philosophy Between Ubuntu and Windows
Now, here’s the main point. The experience that “Ubuntu automatically organizes cache during inference, while Windows holds onto cache once used” accurately captures the fundamental difference in memory management philosophy between the two operating systems.
From my perspective, this is how it works:
Windows Memory Management: ‘Meticulous Secretary’
- Philosophy: “Documents (data) that were used once might be needed again soon, so let’s keep them on the desk (RAM) for quick access.” This is the mechanism known as the Standby List cache.
- Behavior: When an application reads files, that data is cached in RAM. Even after the application closes, the cache is retained as “standby.” This is effective for speeding up the next time the same app or file is opened and works very well for typical desktop usage.
- Issues with AI Inference: In tasks like continuous generation with ComfyUI, the cycle of “load Model A → inference → free memory → load Model B → inference…” repeats rapidly. Windows doesn’t immediately make freed memory completely “free” but keeps it “on standby” just in case. When a new memory allocation request arrives, the OS tries to organize the standby list to create free space, but this organization sometimes can’t keep up with the fast demand cycle of AI. As a result, even though usable cache exists, the application judges “insufficient memory” and errors occur. This is precisely the state of “holding onto cache.”
Ubuntu (Linux) Memory Management: ‘Adaptable Site Supervisor’
- Philosophy: “If there’s free workspace (RAM), let’s spread out tools (data) to improve work efficiency. But when new large materials (memory allocation requests) arrive, immediately clear away unused tools to make space!” This is the Page Cache mechanism.
- Behavior: Linux also actively uses free memory for file caching. The philosophy is similar to Windows.
- Behavior During AI Inference: The decisive difference is responsiveness when memory is under pressure. When apps like ComfyUI request massive amounts of memory (e.g., several GB of model data), the Linux kernel recognizes it as a “high-priority urgent request” and actively and quickly discards low-priority old cache to secure the requested memory space. This movement is so agile that users perceive it as “automatically organizing cache during inference.”
My Perspective
This observation is not just subjective but technically accurate, rooted in the design philosophy differences at the kernel level of both operating systems.
| Item | Ubuntu (Linux) | Windows |
|---|---|---|
| Basic Philosophy | Actively uses free memory for cache but immediately yields it when requested (adaptable) | Prioritizes retaining free memory as cache for future speedup (advance preparation) |
| Cache Handling | Dynamic and rapid release according to memory pressure | Retained as standby list, with relatively gradual release decisions |
| Behavior During AI Inference | Responds agilely to large memory requests, less likely to run out of memory | Rapid repeated memory allocation/deallocation can cause cache organization to fall behind, more prone to memory shortage |
| User Experience | Flexible, automatically organized | Doesn’t let go once grasped, holding on |
For these reasons, below is a practical record of installing Ubuntu.
Introduction
This time, I installed Ubuntu on the GMKtec EVO-X2 Mini PC. This machine is a high-performance mini PC equipped with AMD Ryzen AI 9 HX 395 MAX.


This article explains the practical steps from initial setup (confirming no initial defects with Windows) to Ubuntu network installation.
Installation Flow:
- Initial boot confirmation with Windows (hardware initial defect check)
- Complete Windows deletion
- Ubuntu installation via PXE network boot
Main Specifications
| Item | Specification |
|---|---|
| CPU | AMD Ryzen AI 9 HX 395 MAX (Zen 5, 8-core/16-thread) |
| GPU | Radeon 890M (RDNA3, 16 CU) integrated |
| NPU | Ryzen AI XDNA2 Engine (approx. 50 TOPS) |
| Memory | LPDDR5X 128GB (CPU/GPU/NPU shared, UMA configuration) |
| Storage | 1.82TB SSD |
Note: It’s not that “GPU is not equipped” – there’s just no external card, as the GPU cores are integrated within the SoC.
1. Initial Setup: Handling Keyboard Issues
Keyboard Recognition During Initial Boot
During initial setup, work cannot proceed if the keyboard isn’t recognized. Even with wireless keyboards, USB receiver-based models are recognized from initial setup.
Bluetooth keyboards often don’t work in early stages, so either of the following is recommended:
- USB receiver wireless keyboard (recommended)
- Wired USB keyboard
Initial Defect Check with Windows
Since the EVO-X2 came with Windows pre-installed, I first confirmed it booted normally with Windows. This allows confirmation that there are no hardware initial defects.
After confirmation, Windows was completely deleted and Ubuntu was clean-installed.
2. Why Ubuntu? Technical Comparison of Memory Efficiency
Windows vs Ubuntu Memory Management
For AI inference and container environments, Ubuntu offers superior memory efficiency.
Comparison Table
| Comparison Item | Windows | Ubuntu (Linux) |
|---|---|---|
| Initial Memory Usage | High (many resident OS services) | Low (fewer daemons, lightweight) |
| AI Inference Memory Management | GPU memory virtualized/partitioned by driver | Direct GPU memory utilization (less overhead) |
| I/O Cache | System cache tends to bloat | Stable with minimum necessary |
| Docker / ROCm Compatibility | Execution via WSL layer | Native execution, direct management of all memory |
| NPU / GPU API | DirectML / ONNX Runtime | ROCm / CUDA / OpenCL / Vulkan — more direct |
| Measured (same configuration) | VRAM usage +10~20% higher | Tends to run smaller with same model |
Technical Reasons
① OS Kernel Memory Overhead
Windows:
- GUI subsystem (Win32/GDI), service groups (Defender, Telemetry, Audio stack, etc.) constantly occupy several GB
- Approximately 4-6 GB already in use before AI execution
Ubuntu:
- In CUI environment, base usage is about 600-900 MB
- More free memory during inference, fewer cache conflicts
② GPU Driver Memory Reservation Method
Windows WDDM (Windows Display Driver Model) tries to share “virtual VRAM” across multiple apps, so it manages by showing more than the actual GPU VRAM. As a result, when AI frameworks try to secure actual VRAM, several hundred MB to several GB are already treated as “system reserved.”
Ubuntu (amdgpu/ROCm or nvidia-driver) directly manages memory via kernel modules, so unnecessary “virtual reservation” areas don’t occur.
③ Docker and PyTorch Behavior
On Windows:
- Docker Desktop → Hyper-V/WSL2 → Linux VM → Container – a multi-layer structure
- Memory and GPU access have increased layers
On Ubuntu:
- Docker runs natively, so
--gpus allcan directly allocate GPU memory to containers - Higher transfer efficiency, less initial allocated memory
④ Cache and Paging
Ubuntu has flexible memory management and automatically releases cache during AI inference. Windows, on the other hand, tends to “retain cached memory” and is more prone to memory shortage.
Especially with ComfyUI / Stable Diffusion, Ubuntu tends to be more stable during extended continuous operation.
3. BIOS Settings
Before installing Ubuntu, BIOS settings need to be changed.
3-1. Disabling Secure Boot
Reasons to Disable Secure Boot:
From actual experience, when updating display drivers on Ubuntu with Secure Boot enabled, the system failed to boot.
Therefore, when using Ubuntu, disabling Secure Boot is recommended.
3-2. Changing Boot Order
To install Ubuntu via network boot, set Network as highest priority in boot order.
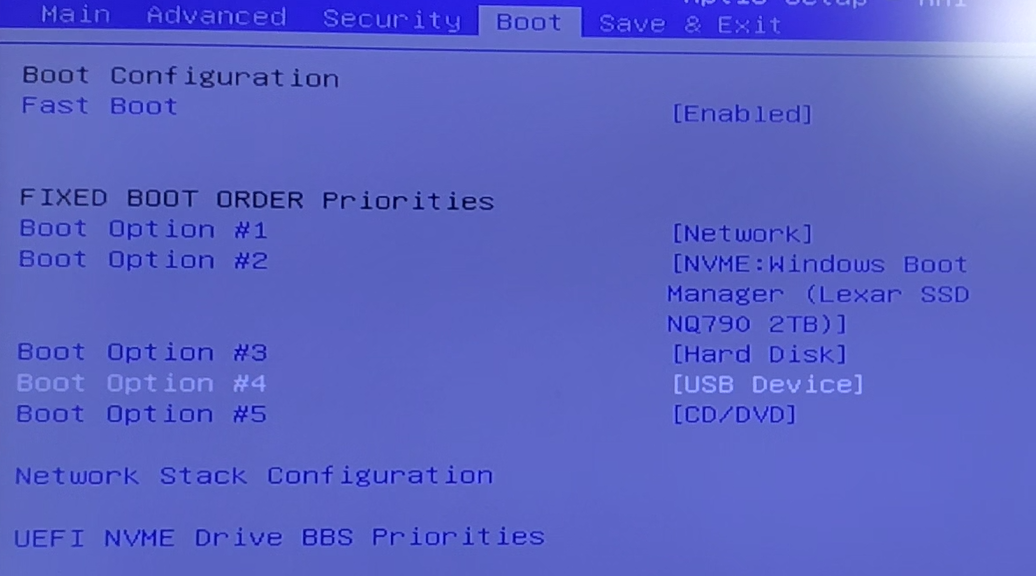
Settings:
- Boot Option #1: Network (for PXE boot)
- Boot Option #2: NVME (internal SSD)
- Boot Option #3: Hard Disk
- Boot Option #4: USB Device
- Boot Option #5: CD/DVD
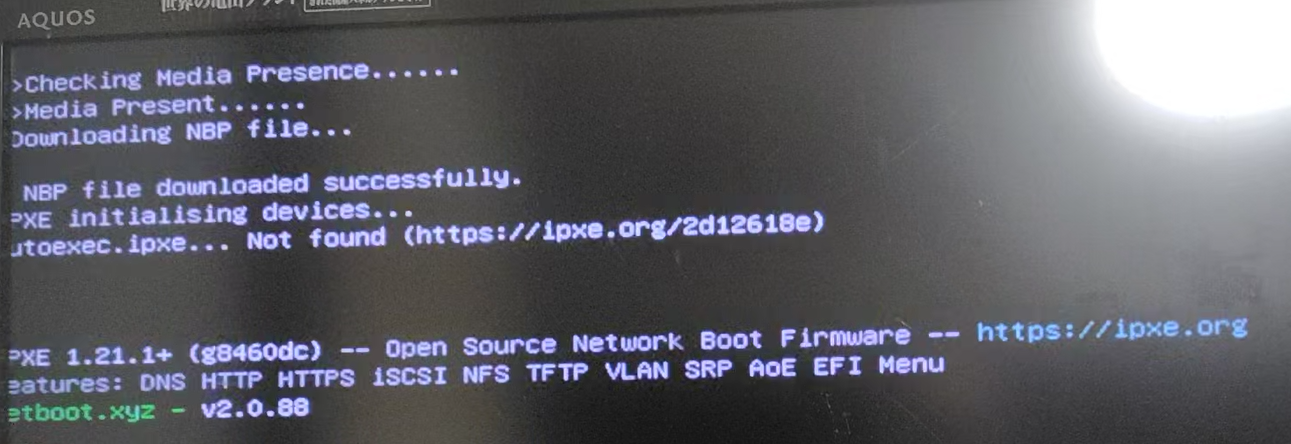
4. Installation via PXE Network Boot
Advantages of PXE Boot
This time, Ubuntu was installed using PXE network boot instead of USB media.
PXE Boot Advantages:
- No USB drive needed
- Can select from multiple OSes
- Obtains latest installer over network
- High reusability (can be used repeatedly once server is built)
About Building DHCP and PXE Servers
For those interested in DHCP servers, networking, and PXE, please refer to:
The above links explain in detail how to build PXE/DHCP servers that work well even on 10-year-old PCs.
Alternatives to PXE Boot
There are other methods to install an OS without external devices:
① UEFI HTTP Boot / iPXE
A “sibling” technology to PXE. Uses HTTP instead of TFTP to retrieve images.
② GRUB Loopback Boot
Method of placing ISO on an internal SSD partition and booting the ISO directly from GRUB.
③ Diskless Boot (iSCSI / NFS-root)
Method of placing storage on the network side to boot the OS.
In practical operation, PXE (or HTTP Boot) is the easiest and most reproducible.
5. Installation Precautions
Handling Reboots
During network installation, reboots occur midway. At this point, if you network boot again, the installation will restart from the beginning.
Solutions (choose one):
- Disconnect network connection during reboot
- Restore BIOS boot order (prioritize internal storage)
After installation is complete, it’s recommended to restore boot order as follows:
- Internal storage (SSD)
- Network
Continuing to the next section (SSH connection setup)…
(1) Prepare keys and connection with PowerShell → (2) Enter with VS Code Remote-SSH
Procedure (Windows → Ubuntu)
🖥️ 1) Create SSH Key on Windows Side
Execute the following on Windows (username: minok).
# Skip if C:\Users\minok\.ssh\id_ed25519 already exists
ssh-keygen -t ed25519 -C "minok@win" -f $env:USERPROFILE\.ssh\id_ed25519
-Cis a comment (identification label). → Not related to actual connection, can be any name you like. Examples:"minok@win","mamu@desktop","project-key-2025", etc.
📁 Generated files (Windows side):
C:\Users\minok\.ssh\id_ed25519
C:\Users\minok\.ssh\id_ed25519.pub
💡 Note If you already have keys for GitHub or servers, specify a different name instead of overwriting.
ssh-keygen -t ed25519 -C "minok@win" -f "$env:USERPROFILE\.ssh\id_mamu_2025"
🌐 2) Copy Public Key to Ubuntu
Execute the following in Windows PowerShell. (The remote user is mamu)
type $env:USERPROFILE\.ssh\id_ed25519.pub `
| ssh mamu@192.168.0.108 `
"umask 077; mkdir -p ~/.ssh && cat >> ~/.ssh/authorized_keys && chmod 700 ~/.ssh && chmod 600 ~/.ssh/authorized_keys && chown -R mamu:mamu ~/.ssh"
- The right side (
ssh mamu@192.168.0.108) user is Ubuntu side username - The left side (
$env:USERPROFILE) is Windows user (minok) - Password input is required only on first connection (set during Ubuntu installation)
✅ Safe & Reliable Version
- Reading public key with
Get-Content -Rawsafely passes “as one line”. - Remote side commands in single quotes
'...'are sent as-is without PowerShell interpretation. (~expansion and>>redirect work on remote shell)
Improved One-liner (Windows PowerShell)
Get-Content -Raw $env:USERPROFILE\.ssh\id_ed25519.pub `
| ssh mamu@192.168.0.108 `
'umask 077; mkdir -p ~/.ssh && touch ~/.ssh/authorized_keys && chmod 700 ~/.ssh && chmod 600 ~/.ssh/authorized_keys && cat >> ~/.ssh/authorized_keys'
Summary of What’s “More Reliable”
typevsGet-Content -Rawtype(= Get-Content) passes as line array. Public key is one line so usually OK, but -Raw “always passes as one-line string” and is less error-prone.- Quoting Remote Commands PowerShell’s
'...'wrapping ensures variable expansion and~interpretation are passed to remote side (less likely interpreted locally). - Set Permissions Before Appending
touch → chmod → cat >>order is tuning to prevent the occasional “authorized_keys permissions too broad and rejected.” - Omitting chown Unnecessary when writing to your own home as yourself. Only add
chown -Rif created with sudo, etc.
If it fails, you’ll see:
ssh: connect to host 192.168.0.108 port 22: Connection refused
🧩 Isolating the Cause: Meaning of Connection refused
ssh: connect to host 192.168.0.108 port 22: Connection refused
This doesn’t mean it was blocked by a firewall, but that “there’s no process (sshd) listening on port 22”.
✅ Solution Steps (Ubuntu Side)
1️⃣ Check if SSH Server is Installed
dpkg -l | grep ssh
- If nothing appears, it’s not yet installed.
- If
openssh-serverappears, it’s OK.
2️⃣ Install SSH Server
sudo apt update
sudo apt install -y openssh-server
3️⃣ Start Service and Enable Auto-start
sudo systemctl enable --now ssh
This starts it immediately and enables auto-start from next time.
4️⃣ Check Status
sudo systemctl status ssh
Example output:
● ssh.service - OpenBSD Secure Shell server
     Loaded: loaded (/lib/systemd/system/ssh.service; enabled; vendor preset: enabled)
     Active: active (running)
→ If active (running), communication is possible.
5️⃣ Port Confirmation (Optional)
sudo ss -tlnp | grep ssh
Example output:
LISTEN 0 128 0.0.0.0:22 0.0.0.0:* users:(("sshd",pid=1234,fd=3))
Previously, SSH connection was possible even without checking openssh-server during Ubuntu Server installation. However, the following reasons seem to apply.
🧩 Why “Can Connect Without Installing OpenSSH” Sometimes Happens
✅ 1. Server Edition or Cloud Images (EC2, OCI, Multipass, etc.)
These have openssh-server pre-installed, and the sshd service is enabled.
For example:
sudo systemctl status ssh
# → active (running)
Therefore, SSH connection works even without checking the box. (= “connects even though I don’t remember installing” phenomenon)
⚙️ 2. Cases Pre-installed Even in Desktop Version
In Ubuntu Desktop (especially 22.04 and later), openssh-client is always included even without selecting “OpenSSH Server”. Also, openssh-server may already be included in some ISOs.
Especially:
- OEM builds
- Ubuntu in WSL
- Some non-Minimal ISOs (e.g., Ubuntu Desktop Full Install)
These may include it in the background even if users uncheck it.
🧩 3. Reused Images or Cloud-init Influence
When using disks or templates with SSH previously enabled, sshd settings, keys, and services are inherited.
In this case, even though it feels like a “fresh install,” ~/.ssh and /etc/ssh/ssh_host_* remain, making it operational again.
Perhaps more than the above reasons, it may have become more accurate from Ubuntu 25.04.
⚙️ 3) Connection Confirmation
ssh -i $env:USERPROFILE\.ssh\id_ed25519 mamu@192.168.0.108
Success if “Welcome to Ubuntu…” is displayed.
🧩 4) Simplify with SSH Config File (Recommended)
Execute in PowerShell:
notepad $env:USERPROFILE\.ssh\config
Or open the config file in the following folder with Notepad:
C:\Users\minok\.ssh
Once open, add:
Host ubuntu108
  HostName 192.168.0.108
  User mamu
  IdentityFile C:\Users\minok\.ssh\id_ed25519
  IdentitiesOnly yes
  Port 22
After saving, simply:
ssh ubuntu108
💡 Supplementary Information for Troubleshooting
| Situation | Safe Response |
|---|---|
| About to overwrite existing key | Backup key file or create with different name |
| Using across multiple servers | Change comment or filename per key |
| Might forget which key was registered | Compile public keys into .txt for notes |
Backup method (Windows PowerShell):
Copy-Item $env:USERPROFILE\.ssh $env:USERPROFILE\.ssh_backup -Recurse
🧩 5) Connect with VS Code (Remote-SSH)
1️⃣ Install Extension
From VS Code Extension Marketplace, install 🔹 Remote – SSH.
2️⃣ Connection Setup
Command Palette (Ctrl + Shift + P) → Select Remote-SSH: Connect to Host.... Select the alias ubuntu108 set in ~/.ssh/config earlier.
If the green status bar at bottom left shows SSH: ubuntu108, connection is successful.
On first connection, select “Linux / Ubuntu”, and VS Code automatically installs VS Code Server on the remote side.
3️⃣ What to Check on Server Side (Ubuntu)
| Check Item | Command | Status |
|---|---|---|
| SSH service running | sudo systemctl status ssh | Should be active (running) |
| If disabled | sudo systemctl enable --now ssh | Start and enable auto-start |
| When key auth doesn’t work | chmod 700 ~/.ssh && chmod 600 ~/.ssh/authorized_keys | Fix permissions |
💡 Firewall Explanation Can Be Omitted Normally, within local LAN or immediately after initial cloud setup, port 22 is already open.
sudo ufw allow 22/tcpetc. only needs to be mentioned as an appendix when necessary.
4️⃣ Strengthen Key Login (Optional)
Only set if you want more security.
sudoedit /etc/ssh/sshd_config
# Confirm/change the following
PubkeyAuthentication yes
PasswordAuthentication no   # Disable password login
After changes, reload:
sudo systemctl reload ssh
5️⃣ Troubleshooting Checklist
✅ Has IP address changed? (Can change with DHCP)
✅ Is User name correct? (e.g., mamu)
✅ Is IdentityFile path in ~/.ssh/config correct?
✅ Is port 22 blocked? (Security software/router settings)