Complete Guide to Setting Up an SSH Development Environment with VirtualBox + Ubuntu Server 24.04
As of 2025, using VSCode’s Remote SSH feature has become the best practice when building a development environment with VirtualBox. This article provides detailed instructions so that even beginners can reliably set up their environment.
🔍 Understanding VirtualBox SSH Connections
VirtualBox Environment Overview
🎯 Key Points to Understand
- VirtualBox is software that runs another computer virtually on your PC
- Ubuntu Server is an independent Linux OS running inside VirtualBox
- Normally, virtual machines exist in their own private network
- Special configuration is required to access the VM from outside
Connection Flow
How NAT Networking Works
Host PC’s Network
IP: 192.168.1.100
❌ Direct access not possible
VirtualBox’s Virtual Router
External IP: 192.168.1.100
Internal IP: 10.0.2.1
✅ Translation & forwarding function
Virtual Machine’s Network
IP: 10.0.2.15
✅ Protected environment
💡 Benefits of NAT
- 🛡️ Security: Safe because external direct access is blocked
- 🌍 Internet Connectivity: VM can access external networks
- 🏠 Same as Home Router: Your home WiFi router uses the same NAT technology
- 📦 IP Address Conservation: Multiple VMs can share the same host IP
🎮 Interactive Demo: Experience NAT in Action
How Port Forwarding Works
🔧 Port Forwarding Configuration
127.0.0.1:2222 ➡️ 10.0.2.15:22
Host port 2222 → Guest port 22
🤔 Why Use Port 2222?
- Port 22 is the standard SSH port
- Your host PC might already have an SSH server running
- Use a different port number (2222) to avoid conflicts
- Port numbers above 1024 can be freely used
📊 Port Forwarding Flow
Destination: 127.0.0.1
Port: 2222
Check port forwarding rules
Convert 2222 → 22
✅ Rule found! Start forwarding
Received IP: 10.0.2.15
Received Port: 22
✅ SSH connection established
🎮 Port Forwarding Simulator
SSH Connection Details
🔐 What is SSH (Secure Shell)?
- Encrypted secure communication protocol
- Mechanism for safely operating remote computers
- Connect using password or key authentication
- All communication content is encrypted
🔑 Authentication Method Comparison
✅ Easy to set up
❌ Relatively lower security
❌ Password entry required each time
# Password prompt appears
✅ High security
✅ No password needed
✅ Automatic login possible
ssh-copy-id -p 2222 user@127.0.0.1
SSH Connection Steps
VSCode Remote SSH Integration
💎 Revolutionary Nature of VSCode Remote SSH
- Same experience as local development, but remote
- Files are on the server, processing happens on the server
- But the operation feels completely local
- Extensions work remotely too
🔄 How VSCode Remote SSH Works
👁️ UI Display
⌨️ Input Handling
🎨 Syntax Highlighting
🔐 Encrypted Communication
📡 Bidirectional Data Transfer
⚡ Real-time Sync
💻 Code Execution
📦 Extension Execution
🔍 File Search
🛠 Debug Processing
~/.ssh/config Configuration Example
HostName 127.0.0.1
Port 2222
User username
IdentityFile ~/.ssh/id_ed25519
✨ VSCode Benefits
IntelliSense
Syntax Highlighting
Auto-completion
Breakpoints
Variable Watch
Step Execution
Works Remotely
Language Support
Tool Integration
Commits
Branch Management
Diff View
Introduction: Why SSH Connection is Necessary
When you install Ubuntu Server on VirtualBox, by default you’ll be working with a black console screen. This environment has several limitations:
- No copy and paste functionality
- Inconvenient screen scrolling
- Difficult Japanese input
- Inefficient file editing
By setting up SSH connection, you can operate comfortably from your familiar terminal or VSCode.
Required Software and Versions
- VirtualBox: 7.2.2 or later (latest as of January 2025)
- Ubuntu Server: 24.04 LTS (supported until April 2029)
- Windows Terminal or Tera Term (Windows)
- Visual Studio Code + Remote SSH extension (recommended)
Step 1: Download Ubuntu Server 24.04
- Visit Ubuntu’s official website
- Download Ubuntu Server 24.04 LTS (approximately 3GB)
- Remember where you saved the ISO file
Step 2: Create a Virtual Machine in VirtualBox
Creating the Virtual Machine
- Launch VirtualBox and click the “New” button
- Create a virtual machine with the following settings:
- Name: Ubuntu Server 24.04 (or any name you prefer)
- Type: Linux
- Version: Ubuntu (64-bit)
- Memory Size: 2048MB or more (4096MB recommended)
- Hard Disk: Create new (VDI format, dynamically allocated, 20GB or more)
ISO File Configuration
- Select the created virtual machine and click “Settings”
- Select “Storage”
- Click the empty disk icon under “Controller: IDE”
- From the disk icon on the right, select “Choose a disk file”
- Select the downloaded Ubuntu Server 24.04 ISO file
Step 3: Install Ubuntu Server
Starting the Installation
- Start the virtual machine
- Select “English” for language (Japanese is not recommended for server version)
- Select “Japanese” for keyboard layout
- Leave network settings at default and click “Done”
- Leave proxy settings blank and click “Done”
- Leave mirror server at default and click “Done”
Storage Configuration
- Select “Use an entire disk”
- Review partition settings and click “Done”
- Click “Continue” to confirm
Account Setup (Important)
- Enter the following information:
- Your name: Your name (e.g., John Smith)
- Your server’s name: Server name (e.g., ubuntu-server)
- Pick a username: Username (e.g., john) *lowercase only
- Choose a password: Set a strong password
- Confirm your password: Re-enter password
SSH Server Installation (Important)
- Check “Install OpenSSH server”
- Click “Done”
- Don’t select anything in Featured Server Snaps and click “Done”
Once installation is complete, select “Reboot Now”.
Step 4: First Boot and IP Address Confirmation
Log into the Virtual Machine
- After reboot, log in with your username and password
- Check the IP address with the following command:
ip addr show
Or:
hostname -I
Typically, an IP address like 10.0.2.15 will be displayed. This is the address of VirtualBox’s NAT internal network.
Check SSH Server Status
sudo systemctl status ssh
Confirm that it shows “active (running)”. If it’s not running:
sudo systemctl start ssh
sudo systemctl enable ssh
Firewall Configuration
UFW is disabled by default in Ubuntu 24.04, but check just to be sure:
sudo ufw status
If it shows “Status: inactive”, there’s no problem. If it’s enabled:
sudo ufw allow ssh
sudo ufw allow 22/tcp
Step 5: Configure Port Forwarding in VirtualBox
This is the most critical configuration. Let me explain in detail.
What is Port Forwarding?
In VirtualBox’s NAT mode, the virtual machine exists within its own private network (10.0.2.0/24). It cannot be accessed directly from outside (the host machine). By configuring port forwarding, you can redirect access to a specific port on the host machine to the virtual machine.
Configuration Steps
- Shut down the virtual machine:
sudo shutdown -h now - In VirtualBox Manager, select the virtual machine and click “Settings”
- Select “Network” → “Adapter 1”
- Click “Advanced” to display detailed settings
- Click the “Port Forwarding” button
- Click the “+” icon to add a new rule
- Enter the following settings:
- Name: SSH (any name you prefer)
- Protocol: TCP
- Host IP: 127.0.0.1 (or leave blank)
- Host Port: 2222 (any number 1024 or above)
- Guest IP: 10.0.2.15 (virtual machine’s IP)
- Guest Port: 22
- Click “OK” to save the settings
Step 6: Test SSH Connection
For Windows
Using Windows Terminal / PowerShell:
ssh -p 2222 username@127.0.0.1
Example:
ssh -p 2222 john@127.0.0.1
Using Tera Term:
- Launch Tera Term
- Enter the following:
- Host: 127.0.0.1
- TCP Port: 2222
- Click “OK”
- Enter username and password
For macOS / Linux
ssh -p 2222 username@127.0.0.1
Connection Notes
On first connection, you’ll see this message:
The authenticity of host '[127.0.0.1]:2222' can't be established.
ED25519 key fingerprint is SHA256:xxxxxxxxxxxxx
Are you sure you want to continue connecting (yes/no/[fingerprint])?
Type “yes” and press Enter.
Step 7: Connect with VSCode Remote SSH (Recommended)
Using VSCode’s Remote SSH extension provides a comfortable environment as if you were developing locally.
Install Remote SSH Extension
- Launch VSCode
- Click the extensions icon on the left (or Ctrl+Shift+X)
- Search for “Remote – SSH”
- Install “Remote – SSH” provided by Microsoft
Create SSH Configuration File
- Open the command palette in VSCode (Ctrl+Shift+P or F1)
- Select “Remote-SSH: Open SSH Configuration File”
- Select
~/.ssh/config(For Windows:C:\Users\username\.ssh\config) - Add the following configuration:
Host ubuntu-server
    HostName 127.0.0.1
    Port 2222
    User username
Example:
Host ubuntu-server
    HostName 127.0.0.1
    Port 2222
    User john
- Save the file
Connect from VSCode
- Open the command palette (Ctrl+Shift+P)
- Select “Remote-SSH: Connect to Host”
- Select “ubuntu-server”
- A new window opens, enter your password
- When connected successfully, “SSH: ubuntu-server” appears in the lower left
Set Up Development Environment in VSCode
After connecting, the following operations become possible:
- File editing (with syntax highlighting)
- Integrated terminal usage
- Git operations
- Remote installation of extensions
- Debug execution
Step 8: Configure SSH Key Authentication (Security Enhancement)
Set up SSH key authentication, which is more secure than password authentication.
Generate Keys on Windows (PowerShell)
ssh-keygen -t ed25519 -C "your-email@example.com"
Copy Public Key to Virtual Machine
Method 1: Manual Copy
Display the public key content:
cat ~/.ssh/id_ed25519.pubConnect via SSH and execute the following on the virtual machine:
mkdir -p ~/.ssh
chmod 700 ~/.ssh
echo "paste public key content here" >> ~/.ssh/authorized_keys
chmod 600 ~/.ssh/authorized_keys
Method 2: Use ssh-copy-id (via WSL)
ssh-copy-id -p 2222 username@127.0.0.1
Update VSCode Configuration
Add the following to ~/.ssh/config:
Host ubuntu-server
    HostName 127.0.0.1
    Port 2222
    User username
    IdentityFile ~/.ssh/id_ed25519
Step 9: Start in Headless Mode (Convenient Usage)
You can start the virtual machine in the background without displaying the GUI window.
Start from Command Line
VBoxManage startvm "Ubuntu Server 24.04" --type headless
Stop
VBoxManage controlvm "Ubuntu Server 24.04" poweroff
Or connect via SSH and run:
sudo shutdown -h now
Troubleshooting
Problem 1: Cannot Connect via SSH
Causes and Solutions:
- SSH server is not running
sudo systemctl start sshsudo systemctl enable ssh - Port forwarding settings are incorrect
- Verify the guest IP is correct (usually 10.0.2.15)
- Check if the host port is not already in use
- Windows Defender Firewall
- Allow VirtualBox communication
Problem 2: VSCode Connection Error
Solutions:
- Clear the known_hosts file:
Remove-Item ~/.ssh/known_hosts - Check the syntax of the SSH configuration file
Problem 3: Virtual Machine is Slow
Solutions:
- Increase memory (4GB or more recommended)
- Increase CPU core count (Settings → System → Processor)
- Enable virtualization support (VT-x/AMD-V in BIOS settings)
Network Configuration Options
NAT + Port Forwarding (This Article’s Method)
Advantages:
- Simple configuration
- High security
- Accessible only from host machine
Disadvantages:
- Cannot be accessed from other PCs on the LAN
Bridged Adapter
Advantages:
- Accessible from anywhere on the LAN
- Can be treated like a real machine
Disadvantages:
- Requires a router
- Consumes a separate IP address
Host-Only Adapter + NAT (Two Adapters)
Advantages:
- Combines internet connection and host connection
- More flexible configuration
Disadvantages:
- Slightly complex configuration
Summary
The combination of VirtualBox + Ubuntu Server 24.04 + VSCode Remote SSH is one of the most efficient development environments as of 2025. By following the steps in this article, even beginners can reliably set up their environment.
VSCode’s Remote SSH feature is particularly innovative, allowing you to develop within a virtual machine with the same feel as local development. This enables a unified development experience across Windows, macOS, and Linux environments.
Since SSH connection is fundamental in cloud environments (AWS, Azure, GCP) as well, the experience of setting up this environment will be valuable in the future.
The Following Article Was Published in 2021 and Is Preserved Here to Study the Evolution Process
I installed Ubuntu Minimal using VirtualBox, but operating it was difficult because it showed a black console screen instead of a desktop interface. So I decided to connect to this virtual machine using Tera Term. Since this type of environment is overwhelmingly common in the cloud, I recommend that everyone build an environment for learning purposes.
Let’s proceed. I want to make an SSH connection, so I’ll check if the appropriate software is installed.
sudo systemctl status sshd
It’s not installed, so I’ll install it.
sudo apt install ssh
I’ll also check the firewall port opening status. It showed “inactive”, meaning that although it’s installed, it’s not running, so I understand that connections won’t be rejected.
sudo ufw status
Next, I need to configure VirtualBox itself, so I’ll shut down the OS. Before shutting down, I’ll make note of this virtual machine’s IP address.
Click Settings in VirtualBox. Select Network, then click “Advanced” in the Adapter tab to display details.
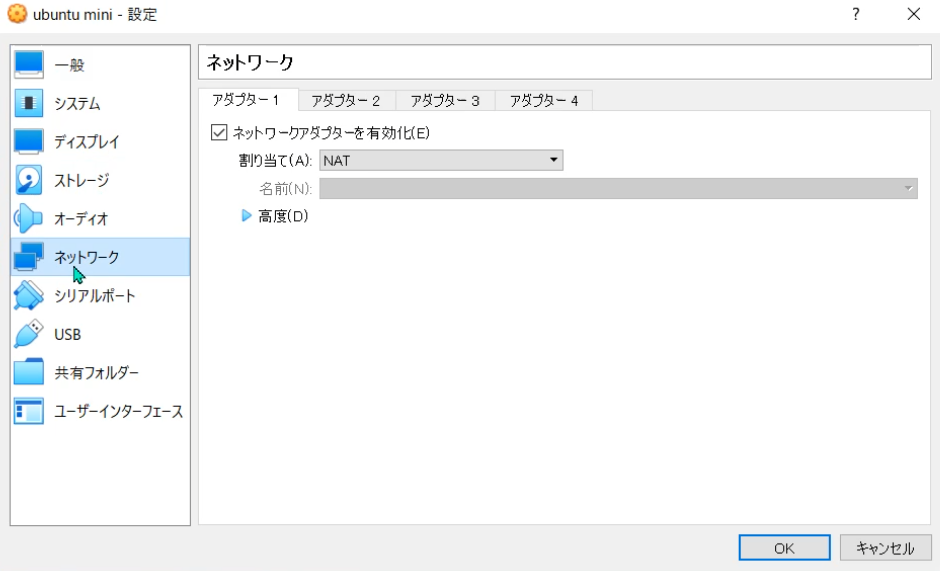
I’ll use the port forwarding available here. A port configured with port forwarding functions as a gateway for the mapped address port, and all packets sent and received externally are automatically transferred, making SSH connection to the virtual machine possible.
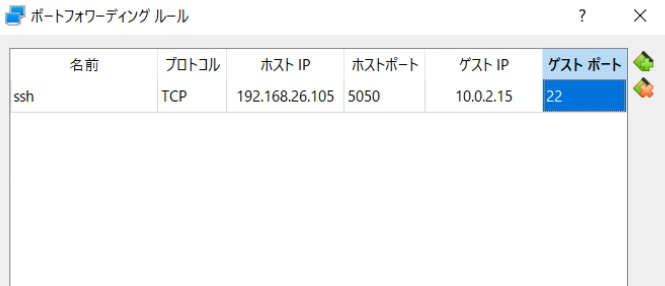
I’ll create a new rule. The name can be arbitrary, and I’ll enter the IP address of the PC I’m operating in Host IP. You can find the IP address by entering the following command in Command Prompt:
ipconfig
I set the Host Port to 5050. Enter the virtual machine’s IP address in Guest IP, and enter 22 in Guest Port.
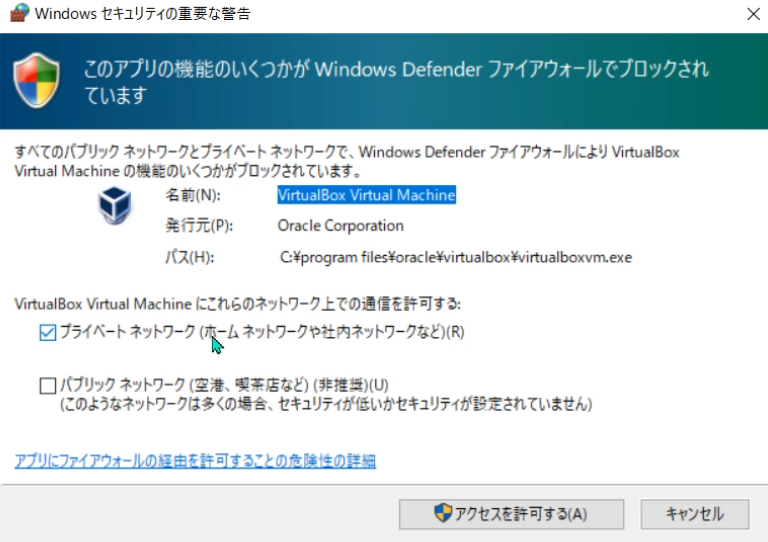
Now the IP addresses of the operating PC and the VirtualBox virtual machine can send and receive. I’ll start the virtual machine. At this time, if a Windows Defender warning appears, allow access.
I’ll verify in Command Prompt whether sending and receiving is actually possible.
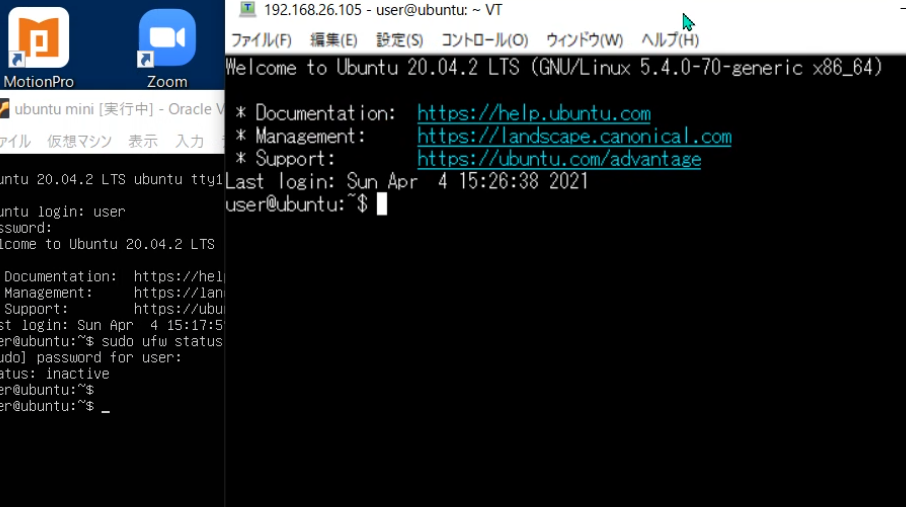
telnet 192.168.26.105 5050
The OpenSSH display appeared and connection was confirmed.

Open Tera Term and enter the Host and TCP Port as follows:
Host: user@192.168.26.105 TCP Port: 5050
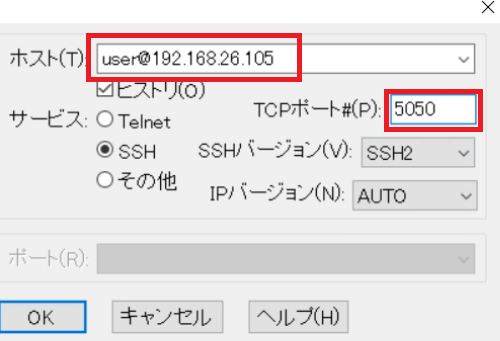
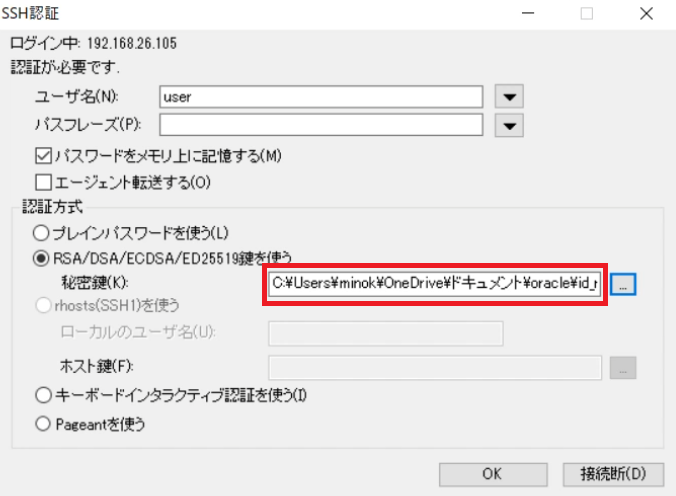
When you press the OK button, an authentication screen appears, so log in by entering the Ubuntu virtual machine’s username and password.
Since we’re at it, let’s also try connecting with authentication keys. I’ll create a directory on the virtual machine that will be needed later. I’ll create a directory called .ssh in the home directory and grant appropriate access permissions.
mkdir .ssh

# Change directory permissions to 700 (only owner can read, write, execute)
chmod 700 .ssh
Now, click “SSH Key Generation” in Tera Term’s Settings tab. Press “Generate” to save the public and private keys.
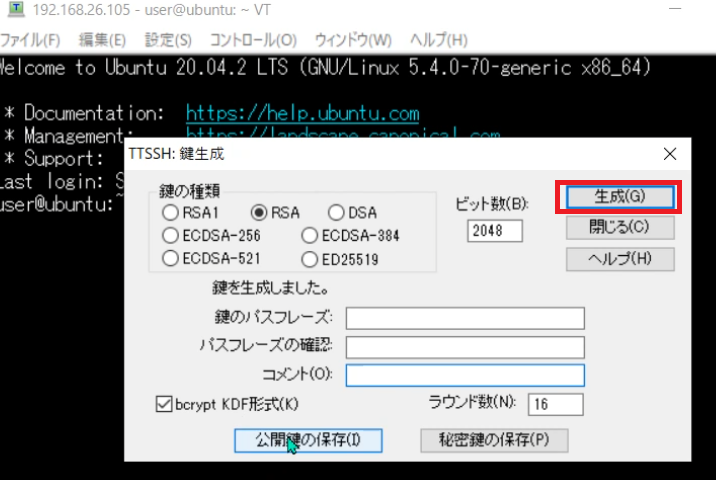
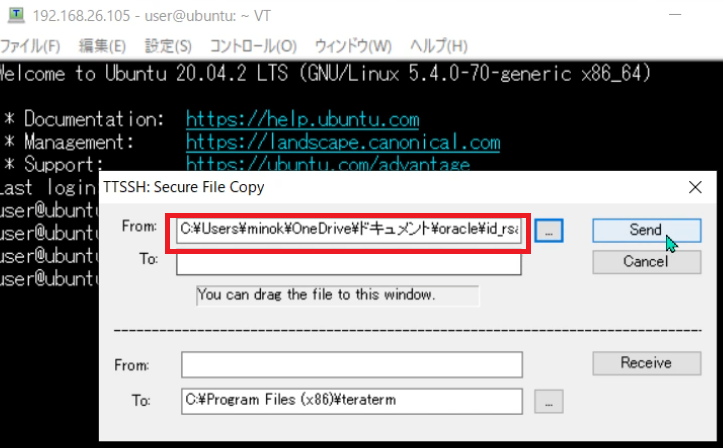
The public key has a .pub extension, and I’ll transfer this to the virtual machine. Transfer is also possible using Tera Term’s functionality. SSH SCP in the File tab does this. In the “From” section at the top, I’ll load the public key with .pub extension that was just generated. I left the “To” section blank. When blank, the file is transferred to the current directory.
I’ll copy the .pub file to the .ssh directory I created earlier with a different filename. I’ll also set appropriate permissions for the created file.
# Copy the public key to the .ssh directory as a file named authorized_keys
cat id_rsa.pub >> .ssh/authorized_keys

# Change permissions of authorized_keys file to 600 (only owner can read and write)
chmod 600 .ssh/authorized_keys

# Delete the transferred public key as it's no longer needed
rm id_rsa.pub
When connecting with Tera Term, I’ll now use key-based connection. I’ll select the private key and connect.