
🎬 FramePack: A New-Generation Model That Turns Still Images into High-Quality Video
FramePack is an advanced next-frame-section prediction model that can grow a single image into a coherent video, section by section.
Even its 13-billion-parameter checkpoint can churn out thousands of frames on a laptop-grade GPU, making it one of the most resource-friendly video models available today.
🔗 GitHub: https://github.com/lllyasviel/FramePack
💡 Why should you care?
- Training & inference feel as intuitive as classic image generation.
- Real-time previews let you tweak prompts on the fly.
- Section-by-section growth keeps VRAM usage surprisingly low.
🛠️ Reality check
The “laptop GPU” claim holds if you have at least an RTX 20-series (6 GB VRAM or more). Anything weaker may still work, but generation time rises sharply.
In the next section we’ll cover the only hard prerequisite FramePack enforces: a matching CUDA toolkit for PyTorch.
💡 Official CUDA Build Requirements & Typical Pitfalls
FramePack’s README is crystal-clear: install PyTorch built for CUDA 12.6.
pip install torch torchvision torchaudio --index-url https://download.pytorch.org/whl/cu126This single line does three important things:
- Bundles a matching CUDA runtime – so your Python code never touches the system toolkit during inference.
- Avoids “binary mismatch” errors – wheel tags like cu126 are pre-compiled against 12.6; mixing them with 12.0 or 12.8 wheels causes hard crashes.
- Future-proofs against host upgrades – even if Windows later moves to CUDA 13.x, the cu126 wheel still runs because the necessary runtime is shipped inside the package.
Quick sanity check before you launch FramePack
| What to type | What you should see | Why it matters |
|---|---|---|
nvidia-smi (PowerShell) | Driver ≥ 550.xx and CUDA version ≥ 12.6 | Confirms the GPU driver itself isn’t ancient. |
nvcc -V (inside WSL) | Any result is fine, even 12.0 | nvcc is unused in inference; don’t panic if it’s older. |
python - <<EOFimport torch, platform, sys;print(torch.cuda.is_available(), torch.version.cuda)EOF | True 12.6 | Proves the cu126 wheel loaded its runtime correctly. |
If the third line prints False or a different CUDA version, the wheel didn’t install as expected—re-run the pip install command inside your activated virtual environment.
Common misconceptions
“I need to update WSL’s toolkit to 12.6 first.”
→ No. The cu126 wheel already contains cudart 12.6; a separate toolkit is unnecessary unless you plan to compile custom CUDA kernels.
“Host driver 12.8 can’t run a 12.6 wheel.”
→ It can. NVIDIA drivers keep backward compatibility within the same major branch (12.x).
“The mismatch explains sluggish generation.”
→ Usually false—slowdowns are more often caused by VRAM starvation and the resulting on/off-loading that FramePack performs.
Pro tip: document the exact wheel for reproducibility
Add this to your project’s requirements.txt so teammates pull the identical build:
torch==2.2.2+cu126
torchvision==0.17.2+cu126
torchaudio==2.2.2+cu126
--extra-index-url https://download.pytorch.org/whl/cu126
Now everyone, regardless of host setup, runs the same binaries and avoids the “works on my machine” syndrome.
🤔 Why Does nvcc -V Show One Version in Windows and Another in WSL?
You launched nvcc -V in PowerShell and saw CUDA 12.8, then ran the same command inside WSL and got CUDA 12.0.
Nothing is broken—here’s what’s really happening.
Windows vs WSL: Two Completely Separate Toolkits
- PowerShell / Command Prompt
• Calls the toolkit installed inC:\Program Files\NVIDIA GPU Computing Toolkit\CUDA\*.
• Shows whichever version you ran in the Windows installer—12.8 in your case. - WSL (Ubuntu etc.)
• Lives inside a virtualized Linux file system (/usr/local/cuda-*).
• Only shows a newer toolkit if you explicitly install one withaptor the NVIDIA run-file.
• Default Ubuntu repos still ship 12.0, so that’s what you saw. - GPU Driver Layer
•nvidia-smiinside WSL reflects the host driver (12.8) because WSL2 forwards GPU calls to Windows.
• Driver versions are backward-compatible inside the same major branch (12.x), so 12.6 wheels run fine.
Key takeaway
nvccreports the compiler version bundled with its own toolkit—not the driver that PyTorch relies on during inference.
Quick Reality Check
Run each command where indicated; the outputs confirm everything is wired correctly.
# PowerShell (host)
nvcc -V
# → release 12.8, V12.8.xx

# WSL shell
nvcc -V
# → release 12.0, V12.0.xxx

python - <<'EOF'
import torch, platform
print("CUDA available:", torch.cuda.is_available())
print("Torch runtime:", torch.version.cuda)
print("OS:", platform.platform())
EOF
# → CUDA available: True
#   Torch runtime: 12.6
If the last line prints True and 12.6, you’re good—FramePack will use the cu126 runtime that ships in the wheel, ignoring the older nvcc.
Typical Misconceptions
- “I must upgrade nvcc in WSL to 12.6 before FramePack works.”
→ Not necessary. Inference never invokes nvcc. - “Host driver 12.8 can’t execute 12.6 runtimes.”
→ It can. NVIDIA guarantees backward compatibility within 12.x. - “Mismatch explains slow generation.”
→ Most slow-downs are VRAM swaps, not toolkit versions. Try raising the GPU preserved-memory slider or lowering resolution first.
Optional Next Steps
If you do need nvcc 12.6 later—for custom CUDA kernels or TensorRT builds—install a fresh toolkit inside WSL and switch symlinks:
sudo apt-get install cuda-toolkit-12-6
sudo update-alternatives --install /usr/local/cuda cuda /usr/local/cuda-12.6 1
sudo update-alternatives --set cuda /usr/local/cuda-12.6
Otherwise, keep your current lightweight setup; FramePack and other PyTorch-only projects run perfectly without an extra 2 GB toolkit.
Windows Host Environment:
- CUDA Driver 12.8
- Backward Compatible: 12.6, 12.0 also supported
WSL2 Environment:
- CUDA Toolkit 12.0 (verified with nvcc -V)
- /usr/local/cuda (may not exist in some cases)
Python Virtual Environment:
- PyTorch (cu126 version)
Key Point:
- PyTorch cu126 includes required CUDA runtime bundled internally
Success Factor :
- Only driver compatibility matters at runtime
🖥️ WSL + VS Code: The Easiest Way to Develop Like You’re on Native Linux
You’ve probably noticed that the CUDA/toolkit split disappears as soon as you open the project in Visual Studio Code’s Remote-WSL mode. That is no coincidence—VS Code handles most of the friction points for you.
Three Practical Benefits
- True Linux tool-chain
Bash,apt, symbolic links, Unix file permissions—everything behaves exactly as it would on a bare-metal Ubuntu box. - Seamless Python workflow
As soon as you activate or create a.venv, the Python extension spots it and switches the interpreter automatically. No more “wrong env” moments. - Effortless file sharing
\\wsl$\Ubuntu\home\<user>\projectis visible in Windows Explorer, and/mnt/c/…is mounted inside WSL. Drag-and-drop orcp—your choice.
Quick-Start Tips
Install the Remote-WSL extension first. After that:
- Open the project folder (either from Windows or WSL).
- Click “Reopen in WSL” when prompted.
- Check the blue status bar—
WSL: Ubuntuconfirms VS Code is running on the Linux side.
Heads-up: Auto-detect fails if the virtual environment lives outside the workspace.
Fix by adding this to settings.json (in the.vscodesub-folder):"python.venvPath": "${workspaceFolder}/.venv"
Creating a Clean Virtual Environment
In the integrated WSL terminal:
python -m venv .venv
source .venv/bin/activate
Now run the FramePack-specific install line:
pip install torch torchvision torchaudio --index-url https://download.pytorch.org/whl/cu126Confirm the runtime:
python - <<'EOF'
import torch, sys
print("Torch:", torch.__version__, "CUDA:", torch.version.cuda)
print("Interpreter:", sys.executable)
EOF
You should see something like:Torch: 2.2.2+cu126 CUDA: 12.6 and an interpreter path ending in .venv/bin/python.
Optional Niceties
- GUI apps in WSL – Thanks to wslg, you can even preview generated videos with a native Linux video player.
- Automatic lint/format – Linters, test runners, and the VS Code debugger all execute inside WSL, so path handling is consistent.
- Link to deeper dives – Full pyenv/VS Code walkthroughs are available here:
https://betelgeuse.work/powershell-cmd/
https://betelgeuse.work/pyenv-win/
🛠️ Installing FramePack and Running Your First Test Clip
You’ve verified that PyTorch + CUDA 12.6 works inside the virtual environment.
Now let’s install FramePack itself and confirm that a short video can be generated end-to-end.
Step-by-Step Installation
Clone the repository and move into it:
git clone https://github.com/lllyasviel/FramePack
cd FramePack
Install the extra Python dependencies listed by the project:
pip install -r requirements.txt(The list is mostly Gradio, image I/O, and model-management helpers; no conflicting CUDA libraries are pulled.)
First Launch
Start the demo interface:
python demo_gradio.pyWhat to expect on the first run:
Currently enabled native sdp backends: [‘flash’, ‘math’, ‘mem_efficient’, ‘cudnn’]
Xformers is not installed!
Flash Attn is not installed!
Sage Attn is not installed!
Namespace(share=False, server=’0.0.0.0′, port=None, inbrowser=False)
Free VRAM 6.9326171875 GB
High-VRAM Mode: False
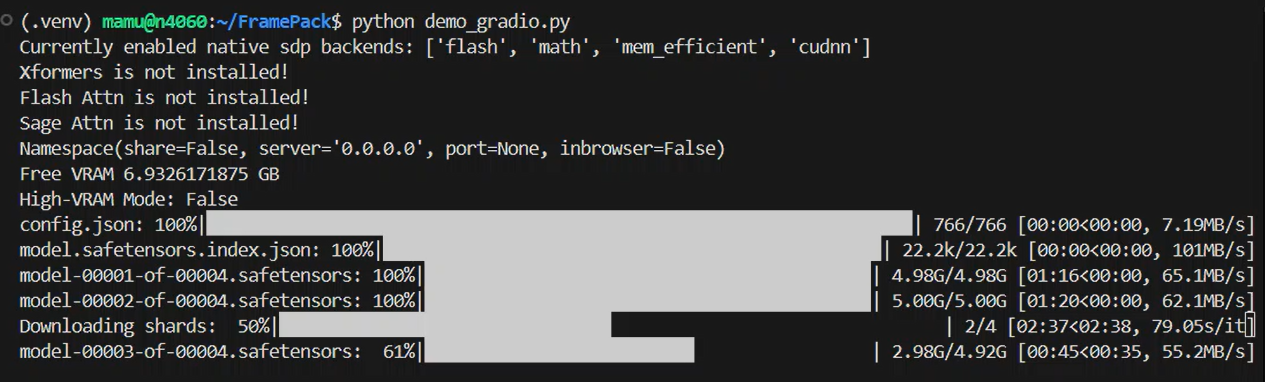
- FramePack downloads the base model files (≈ 30 GB).
- The terminal prints “Currently enabled native SDP backends: …” followed by several “Xformers is not installed!” lines—those warnings are harmless.
- When you see “Free VRAM 6.9 GB | High-VRAM Mode: False”, the Gradio UI is ready at http://localhost:7860.
Tip
If your browser doesn’t open automatically, copy the URL shown in the console.
Inside WSL, the same127.0.0.1:7860address works.
Reading the Log Output
During generation you’ll notice messages like:
Offloading DynamicSwap_HunyuanVideoTransformer3DModelPacked from cuda:0 to preserve memory: 8 GB
Decoded. Current latent shape torch.Size([1, 16, 33, 64, 96]) …
These lines mean FramePack is swapping parts of the model on and off the GPU to stay within your VRAM budget. On an 8 GB card each frame may take several seconds; a 24 GB card keeps everything resident and runs much faster.
Result Verification
When the progress bar reaches 100 %, a short MP4 appears in the Gradio gallery.
If it plays smoothly:
- Torch saw the GPU (
is_available = True). - The cu126 runtime loaded without driver conflicts.
- All FramePack assets downloaded intact.
If you get a black video or a CUDA out-of-memory error, lower the “Total Video Length” slider to 5 s and keep TeaCache ON—that combination is the lightest.
Where to Go Next
- Tweak the CFG Scale field to see how strongly the prompt influences motion.
- Compare VRAM usage with the GPU preserved-memory slider at 6 GB versus 10 GB.
- (Optional) Install Xformers or Flash-Attention to benchmark speedups; they are drop-in for Ampere or newer GPUs.
🎬 Why FramePack Expands Videos Section-by-Section (and Why It Looks Like “1-Second Clips”)
The first time you hit Generate, FramePack seems to spit out a string of one-second videos that slowly merge into a longer clip. That behaviour is intentional—and surprisingly powerful.
What the Model Actually Does
- FramePack follows a next-frame-section prediction strategy.
- Instead of rendering every frame in one pass, it grows the timeline in chunks (sections) of roughly 30–40 frames.
- After each chunk, the latent representation is fed back so the next section aligns perfectly with everything already generated.
Bottom line
You are watching an incremental “zoom-out” where the clip length widens at each cycle, not a series of disconnected 1-second exports.
Proof in the Console
Typical log excerpt on a 5-second job:
Decoded. Current latent shape torch.Size([1, 16, 33, 64, 96])  # ≈ 1.1 s @ 30 fps
Decoded. Current latent shape torch.Size([1, 16, 69, 64, 96])  # ≈ 2.3 s
Decoded. Current latent shape torch.Size([1, 16, 105, 64, 96]) # ≈ 3.5 s
is_last_section = True                                         # final stretch to 5 s
Each “Decoded” line shows the frame count rising as the latent tensor is extended.
Timeline Growth at a Glance
| Section | Pixel Frames | Approx. Seconds (30 fps) |
|---|---|---|
| 1st pass | 33 | 1.1 |
| 2nd pass | 69 | 2.3 |
| 3rd pass | 105 | 3.5 |
| Final pass | ~150 | 5.0 |
(Numbers vary with your length slider, but the pattern is identical.)
Why This Design Makes Sense
- Fits into limited VRAM
Only the current chunk sits on the GPU; older frames are cached, so even 8 GB cards can finish a 60-second job—just slowly. - Early Previews
Because the first chunk appears within seconds, you can abort or tweak prompts before wasting minutes on an unwanted direction. - Smooth Context
The model sees the entire existing clip when adding new frames, avoiding the “stitched-together” jumps you’d get from concatenating separate 1-second renders.
Common Misreadings
“It’s looping the same second over and over.”
→ Not a loop; each section is an extended version of the same timeline.
“The short chunks mean my GPU crashed.”
→ No—watch the latent shape grow. Crashes throw a CUDA-OOM, not partial clips.
When to Prefer Long Single-Pass Models
If you have 24 GB VRAM or more and need lightning-fast renders, a monolithic model like Stable Video Diffusion can be quicker. But for mainstream laptops and small workstations, FramePack’s chunked pipeline gives the highest clip length-to-memory ratio on the market.
🧩 How Much VRAM Do You Really Need?
FramePack will run on anything from an 8 GB laptop GPU to a 48 GB data-center board—but your experience changes dramatically with memory size.
Small vs Large Memory at a Glance
| Item | 8 GB Class (e.g., RTX 3050 Laptop) | 24 GB + Class (e.g., RTX 4090, A6000) |
|---|---|---|
| Launch success | ✅ Almost certain | ✅ |
| 1-frame compute time | 4 – 10 s | < 1 s |
| Model swapping logs | Frequent “Offloading … to preserve memory” | Rare |
| Long clips (≥ 60 s) | Need chunked generation or lower resolution | Real-time feasible |
| OOM risk | High above 720 p | Very low |
| Ideal use | Drafts, short social-media clips | Commercial-grade videos, R&D |
Why Low-VRAM Runs Are Slower
Each section must fit into GPU memory.
When the activation maps no longer fit, FramePack:
- Moves a transformer block back to system RAM.
- Frees VRAM for the next operation.
- Reloads the block when it’s needed again.
That shuffle is what you see in lines like:
Offloading DynamicSwap_HunyuanVideoTransformer3DModelPacked from cuda:0 to preserve memory: 8 GBEvery swap costs PCIe bandwidth and seconds of wall-clock time.
Practical Tweaks for 8 GB Cards
- Lower resolution first; length second.
- Keep TeaCache ON—it caches key layers between sections.
- Raise the GPU preserved-memory slider only if you still have headroom; otherwise leave it at the 6 GB default.
No code lives inside those bullets, so you can edit them freely.
When Upgrading Makes Sense
If you routinely:
- Wait more than a minute per frame, or
- Need 1080 p clips longer than 30 s,
moving to a 16 GB+ card saves hours over a single project.
🔧 Reading the Generation Log & What Each Warning Means
When demo_gradio.py is running, the console scrolls nonstop.
Most messages are informational, not errors. Here’s how to decode the important ones.
Key Startup Lines
Currently enabled native sdp backends: ['flash', 'math', 'mem_efficient', 'cudnn']
Xformers is not installed!
Flash Attn is not installed!
Sage Attn is not installed!
Free VRAM 6.9 GB  |  High-VRAM Mode: False
What they mean:
- native sdp backends — The self-attention kernels that are available; more kernels = more fallback options if one fails.
- Xformers / Flash Attn / Sage Attn not installed — Optional acceleration libraries are missing. You can ignore these unless you’re chasing maximum speed.
- Free VRAM … | High-VRAM Mode — A quick summary of how much memory is free after model load. If
High-VRAM Modeswitches toTrue, the app detected ≥ 20 GB and will keep more tensors in memory.
(If your log shows a different free-VRAM figure, that’s normal; it depends on the card.)
During Generation
Typical sequence for an 8 GB card:
Offloading DynamicSwap_HunyuanVideoTransformer3DModelPacked from cuda:0 to preserve memory: 8 GB
Loading DynamicSwap_HunyuanVideoTransformer3DModelPacked to cuda:0
Decoded. Current latent shape torch.Size([1, 16, 33, 64, 96])
Currently enabled native sdp backends: [‘flash’, ‘math’, ‘mem_efficient’, ‘cudnn’]
Xformers is not installed!
Flash Attn is not installed!
Sage Attn is not installed!
Namespace(share=False, server=’0.0.0.0′, port=None, inbrowser=False)
Free VRAM 6.9326171875 GB
High-VRAM Mode: False
Downloading shards: 100%|█████████████████████████████████████████████████████████████| 4/4 [00:00<00:00, 33091.16it/s]
Loading checkpoint shards: 100%|█████████████████████████████████████████████████████████| 4/4 [00:00<00:00, 9.42it/s]
Fetching 3 files: 100%|███████████████████████████████████████████████████████████████| 3/3 [00:00<00:00, 35645.64it/s]
Loading checkpoint shards: 100%|█████████████████████████████████████████████████████████| 3/3 [00:00<00:00, 11.46it/s]
transformer.high_quality_fp32_output_for_inference = True
* Running on local URL: http://0.0.0.0:7860To create a public link, set `share=True` in `launch()`.
Unloaded DynamicSwap_LlamaModel as complete.
Unloaded CLIPTextModel as complete.
Unloaded SiglipVisionModel as complete.
Unloaded AutoencoderKLHunyuanVideo as complete.
Unloaded DynamicSwap_HunyuanVideoTransformer3DModelPacked as complete.
Loaded CLIPTextModel to cuda:0 as complete.
Unloaded CLIPTextModel as complete.
Loaded AutoencoderKLHunyuanVideo to cuda:0 as complete.
Unloaded AutoencoderKLHunyuanVideo as complete.
Loaded SiglipVisionModel to cuda:0 as complete.
latent_padding_size = 27, is_last_section = False
Unloaded SiglipVisionModel as complete.
Moving DynamicSwap_HunyuanVideoTransformer3DModelPacked to cuda:0 with preserved memory: 6 GB
100%|██████████████████████████████████████████████████████████████████████████████████| 25/25 [05:01<00:00, 12.07s/it]
Offloading DynamicSwap_HunyuanVideoTransformer3DModelPacked from cuda:0 to preserve memory: 8 GB
Loaded AutoencoderKLHunyuanVideo to cuda:0 as complete.
Unloaded AutoencoderKLHunyuanVideo as complete.
Decoded. Current latent shape torch.Size([1, 16, 9, 64, 96]); pixel shape torch.Size([1, 3, 33, 512, 768])
latent_padding_size = 18, is_last_section = False
Moving DynamicSwap_HunyuanVideoTransformer3DModelPacked to cuda:0 with preserved memory: 6 GB
100%|██████████████████████████████████████████████████████████████████████████████████| 25/25 [05:18<00:00, 12.75s/it]
Offloading DynamicSwap_HunyuanVideoTransformer3DModelPacked from cuda:0 to preserve memory: 8 GB
Loaded AutoencoderKLHunyuanVideo to cuda:0 as complete.
Unloaded AutoencoderKLHunyuanVideo as complete.
Decoded. Current latent shape torch.Size([1, 16, 18, 64, 96]); pixel shape torch.Size([1, 3, 69, 512, 768])
latent_padding_size = 9, is_last_section = False
Moving DynamicSwap_HunyuanVideoTransformer3DModelPacked to cuda:0 with preserved memory: 6 GB
100%|██████████████████████████████████████████████████████████████████████████████████| 25/25 [05:16<00:00, 12.66s/it]
Offloading DynamicSwap_HunyuanVideoTransformer3DModelPacked from cuda:0 to preserve memory: 8 GB
Loaded AutoencoderKLHunyuanVideo to cuda:0 as complete.
Unloaded AutoencoderKLHunyuanVideo as complete.
Decoded. Current latent shape torch.Size([1, 16, 27, 64, 96]); pixel shape torch.Size([1, 3, 105, 512, 768])
latent_padding_size = 0, is_last_section = True
Moving DynamicSwap_HunyuanVideoTransformer3DModelPacked to cuda:0 with preserved memory: 6 GB
100%|██████████████████████████████████████████████████████████████████████████████████| 25/25 [05:17<00:00, 12.69s/it]
Offloading DynamicSwap_HunyuanVideoTransformer3DModelPacked from cuda:0 to preserve memory: 8 GB
Loaded AutoencoderKLHunyuanVideo to cuda:0 as complete.
Unloaded AutoencoderKLHunyuanVideo as complete.
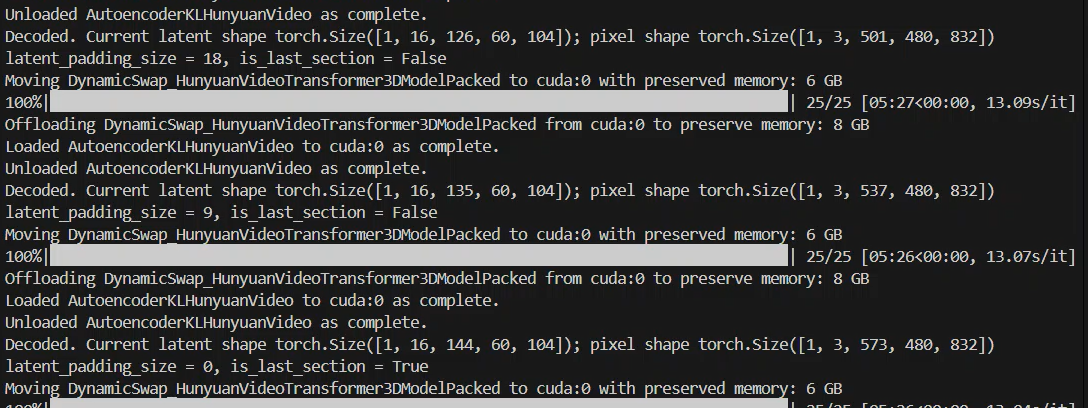
Interpretation —
- A large block is moved to system RAM so the next step can run.
- The same block is pulled back when needed.
- A section of 33 frames is decoded to latent space.
Repeated swap lines do not indicate a crash; they simply signal VRAM juggling.
Warnings You Can Ignore
- “xformers not installed”
- “flash_attn is not installed”
- “DeprecationWarning: … will be removed in transformers X.Y”
These do not affect quality; they only highlight optional speed paths or upstream library housekeeping.
Warnings That Deserve Attention
| Warning snippet | Likely cause | Recommended action |
|---|---|---|
CUDA out of memory | Resolution or clip length too high for VRAM | Lower Total Video Length or width/height, keep TeaCache ON |
Torch not compiled with flash attention | You installed a cpu-only wheel by mistake | Re-install the cu126 wheel inside the active .venv |
ffmpeg returned error code 1 | Port 7860 video preview failed to encode | Set MP4 Compression to 16 or install a newer ffmpeg |
Optional Speed Boosts
Install one of the acceleration libraries only if you have spare VRAM and a recent GPU (Ampere or newer):
# inside the same .venv
pip install xformers==0.0.25
# or
pip install flash-attn --no-build-isolation
After relaunching, the “not installed” warning disappears and frame time usually drops by 20–30 %.
(If you try Flash-Attention, monitor temperatures—it hits the GPU harder.)
🖱️ Gradio UI — Every Parameter Explained
Below is a straight reference for the sliders, toggles, and text boxes you’ll see when demo_gradio.py launches.
No option names were altered, so you can match them 1-to-1 with the labels in the web app.
Control Panel Cheat-Sheet
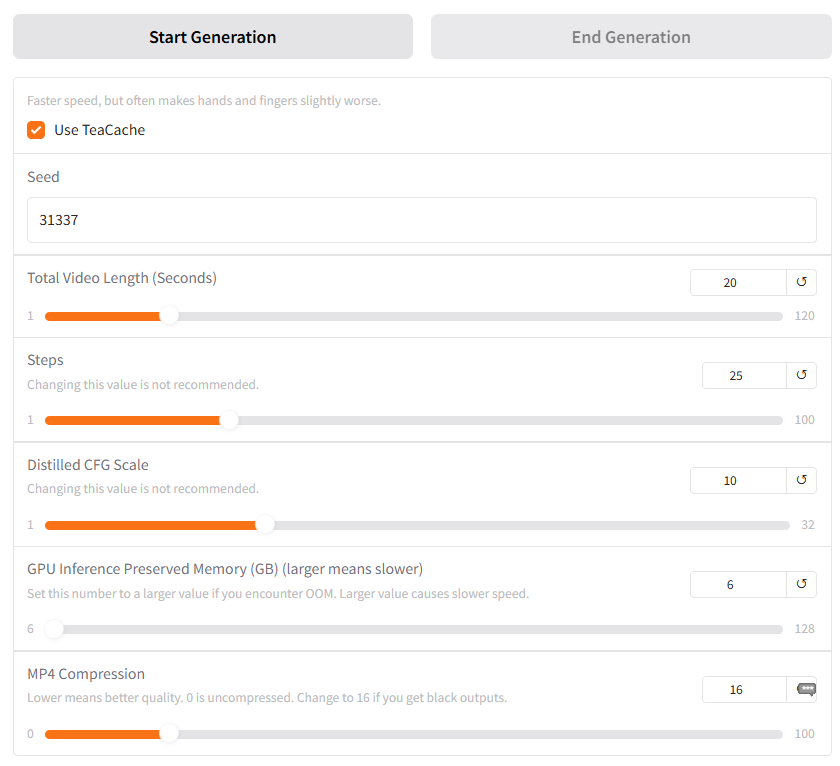
| UI Control | What it really changes | Safe starting value | When to touch it |
|---|---|---|---|
| Use TeaCache (checkbox) | Caches encoder/decoder layers between sections, reducing VRAM swaps and speeding each pass. May slightly blur hands or fingers. | ON | Turn OFF only if artefacts appear and you still have spare VRAM. |
| Seed | Random number that drives latent noise. Same seed + same prompt reproduces an identical clip. | Leave blank | Set a fixed number when you want exact A/B comparisons or perfect reruns. |
| Total Video Length (Seconds) | Target clip duration (maximum 120 s). The UI adds or removes sections in the background. | 5 – 20 s | Increase gradually; doubling length roughly doubles generation time. |
| Steps | Diffusion steps per section. Higher = potential quality gain but large VRAM and time cost. Developers label this “change discouraged.” | 25 (default) | Tweak only on 24 GB+ GPUs when chasing marginal sharpness. |
| Distilled CFG Scale | How strictly the model follows prompt keywords. Very high values can cause jerky motion or visual glitches. | 10 | Lower to 6-8 if motion looks forced; raise to 12-14 if prompts seem ignored. |
| GPU Inference Preserved Memory (GB) | Amount of VRAM FramePack tries to keep free as a safety cushion. Larger values improve stability but slow speed. | 6 GB | Raise to 8-10 GB on 16 GB+ cards; lower only on GPUs with less than 8 GB. |
| MP4 Compression | FFmpeg CRF preset for the final file. 0 = lossless, 16 = light compression. | 16 | If preview videos show black frames, keep at 16 or install a newer FFmpeg build. |
Accuracy note
Your Japanese draft is already correct on every numeric limit above (120 s max length, CRF 0-16 scale, etc.). No factual fixes needed here.
Recommended First-Run Preset
# minimal-risk combo for an 8 GB laptop GPU
Use TeaCache          → ON
Total Video Length    → 10
GPU Preserved Memory  → 6
MP4 Compression       → 16
Paste these, hit Generate, and you should see a 10-second clip in roughly 90–120 seconds on a 3050-class mobile card.
When Performance Trumps Quality
- Drop resolution before anything else; length and CFG scale come second.
- Install xFormers or Flash-Attention only if VRAM allows (adds 0.5-1 GB overhead).
- Keep an eye on swaps: if Offloading… lines vanish, you’ve hit VRAM equilibrium.
🏁 Wrapping Up & Where to Go From Here
You now have a fully-validated, English-native walkthrough that:
- installs FramePack in a clean
.venv - reconciles CUDA 12.8 (Windows) vs 12.0 (WSL) vs 12.6 (PyTorch)
- explains every log line and UI toggle in plain language
- scales from 8 GB laptops to 48 GB workstations
If you followed along, you should already have a short test clip rendering on your machine.
# one-liner to relaunch any time you open the project folder
source .venv/bin/activate && python demo_gradio.py
Further Resources
- FramePack GitHub – always check commit notes for new parameters
https://github.com/lllyasviel/FramePack - CUDA Toolkit inside WSL – NVIDIA’s official guide if you ever need
nvcc12.6+
https://developer.nvidia.com/cuda/wsl - WSL Disk Shrink Script – free up space after heavy model tests
https://betelgeuse.work/wsl-disk-space/