
Working with PowerShell and VSCode
🧹 How to Delete a Python Virtual Environment (venv)
When working with Python in PowerShell or Visual Studio Code, deleting a virtual environment is sometimes necessary—especially when you’ve switched Python versions or your environment has become unstable.
Deleting the virtual environment is simple, but there are a few important differences depending on your operating system and shell.
🗑 How to Delete a Virtual Environment
You can remove the venv folder manually or via command line. Here are the recommended methods:
Windows – File Explorer
Right-click the venv folder and select Delete.
Windows – PowerShell or CMD
Use this PowerShell command:
Remove-Item -Recurse -Force venvNote: Do not use rmdir /s /q venv in PowerShell. That command is specific to CMD and will result in an error in PowerShell.
Mac / Linux – Terminal
Use the following command:
rm -rf venvThis will forcefully and recursively delete the folder.
📌 When Should You Delete a Virtual Environment?
There are a few key situations where deleting and recreating your environment is recommended:
- Your environment is broken or behaving unexpectedly.
- You want to start fresh with clean package installations.
- You’ve switched Python versions using
pyenv, and the current environment no longer reflects the correct version.
This last point is especially important. Once a virtual environment is created, it is tied to the specific Python version that was active at the time. Even if you change the global version with pyenv, the existing virtual environment will not update. That’s why it’s often necessary to delete the old venv and create a new one.
🔧 Understanding Python Version Lock-in with pyenv and venv

When using pyenv to manage Python versions on Windows, especially with pyenv-win, it’s important to understand how Python versions interact with virtual environments.
🔒 Virtual Environments Lock in the Python Version
Once you create a virtual environment with python -m venv venv, it becomes permanently tied to the active Python version at that time.
Even if you change the version with pyenv global or pyenv local, the existing venv will not reflect that change. You must delete and recreate the virtual environment to apply a new Python version.
✅ Best Practices for Managing pyenv and venv
To ensure your virtual environment uses the correct Python version, follow these steps:
Step 1: Deactivate any active environment
If you’re already in an active virtual environment, deactivate it first:
deactivateStep 2: Check the current global Python version
Use this command to verify the Python version currently in effect:
python -VExample output:
Python 3.10.11
This should match the version you selected with pyenv.
Step 3: Create a new virtual environment
Now that you’re using the correct version, delete the old environment and create a new one:
python -m venv venvThis ensures that the virtual environment is built on top of the intended Python version.
Step 4: Reactivate your shell or terminal
Sometimes, changes made by pyenv aren’t applied immediately. Restart PowerShell, CMD, or your VSCode terminal to make sure the environment is refreshed.
⚙️ Why CMD and PowerShell Commands Differ
While both Command Prompt (CMD) and PowerShell are native shells in Windows, they are fundamentally different in their design and purpose. Understanding these differences is essential when working with Python, virtual environments, or tools like pyenv.
🧠 PowerShell Was Designed for System Administration
PowerShell was built with system administrators in mind. Unlike CMD, which processes only plain text, PowerShell is object-oriented and processes structured data (objects). This makes it far more powerful and versatile for automation and scripting tasks.
📚 CMD Compatibility Through Aliases
To reduce the learning curve, Microsoft added aliases to PowerShell so users could still type familiar CMD commands such as dir, cd, or del. These aliases internally map to native PowerShell commands:
| CMD Command | Works in PowerShell? | PowerShell Equivalent |
|---|---|---|
dir | ✅ Yes | Get-ChildItem |
cd | ✅ Yes | Set-Location |
del | ✅ Yes (with caveats) | Remove-Item |
⚠️ However, even though these aliases look the same, they don’t always behave exactly the same—especially when dealing with directories or non-standard file types.
🔒 Why rmdir /s Doesn’t Work in PowerShell
CMD commands like rmdir /s /q venv may result in errors when executed in PowerShell. That’s because PowerShell expects different syntax and treats parameters differently.
Instead, use:
Remove-Item -Recurse -Force venvThis is the correct PowerShell equivalent and works consistently.
🔄 Evolution for Security and Cross-Platform Use
As Windows continues to evolve, so does PowerShell. It has now become cross-platform and is available on macOS and Linux. This shift encourages more standardized, POSIX-compliant behavior, moving further away from traditional CMD conventions.
✅ In Summary
- CMD is legacy, designed for simplicity and quick command execution.
- PowerShell is future-focused, built for automation, scripting, and cross-platform compatibility.
- CMD-style commands may work in PowerShell, but they are often implemented as aliases, and subtle differences can cause unexpected results.
- Use native PowerShell commands for reliability and clarity, especially when automating tasks.
📌 Setting the Correct PATH Order for pyenv-win
When using pyenv-win to manage multiple Python versions on Windows, the order of directories listed in your system’s PATH environment variable becomes critically important.
If the PATH is not set correctly, your system may continue using the wrong version of Python—even if you’ve configured pyenv properly.
⚙️ How pyenv-win Works
pyenv-win installs Python versions into a hidden folder inside your user directory and uses shims to control which version is executed when you run the python command.
A shim is a small script (such as python.bat) located in the shims directory that acts as a proxy—it redirects to the actual Python version selected via pyenv.
🔑 Why PATH Order Matters
Windows searches through the PATH directories from top to bottom. The first matching executable it finds is the one that gets executed.
To ensure that the correct version of Python is used, the following pyenv directories must be placed at the top of your user PATH:
%USERPROFILE%\.pyenv\pyenv-win\shims
%USERPROFILE%\.pyenv\pyenv-win\bin
If any other Python installation (e.g., from the Microsoft Store or the official Python installer) appears above these lines in your PATH, it will override the pyenv version—even if you’ve configured pyenv correctly.
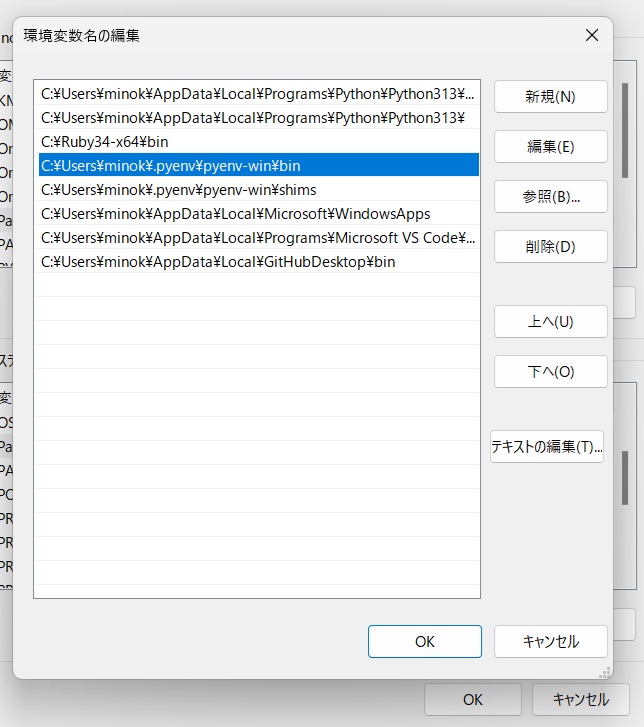
🔍 How to Check and Adjust Your PATH
- Open the System Environment Variables dialog:
- Press
Windows + S, search for “Environment Variables”, and open Edit the system environment variables.
- Press
- In the User variables section, find and select
PATH, then click Edit. - Ensure the following two paths are listed before any other Python-related paths:
%USERPROFILE%\.pyenv\pyenv-win\shims%USERPROFILE%\.pyenv\pyenv-win\bin - Move them to the top of the list using the arrow buttons.
- Click OK to save changes.
🔄 Restart Your Shell After Changing PATH
After updating the PATH, be sure to restart PowerShell, CMD, or your terminal in VSCode so that the new environment settings are properly loaded.
You can verify the change using:
python -Vor
pyenv which pythonThese commands should now reflect the Python version managed by pyenv.
🧭 Comparing pyenv (Linux) and pyenv-win (Windows)
While both pyenv (for Linux/macOS) and pyenv-win (for Windows) share the same name and basic purpose—managing multiple Python versions—their internal implementations are very different.
Understanding these differences is essential when working across platforms or debugging environment-related issues.
🐧 pyenv for Linux (Original)
- Designed for Unix-based systems like Linux and macOS
- Operates in Bash or Zsh shells
- Implements subcommands like
pyenv install,pyenv whichas Bash functions - Fully integrated into the Unix shell environment
- Highly customizable and scriptable
🪟 pyenv-win for Windows
- Designed specifically for Windows environments
- Operates in PowerShell and CMD
- Implements functionality using batch files and Python scripts
- Independent implementation from the Linux version
- Does not provide Linux command-line tools like
ls,grep, orcat
❗Important Notes
- The command structure of
pyenv-winresembles that of Linuxpyenv, but the internals are entirely different. - Commands like
pyenv which,pyenv globalare reimplemented in Python or batch scripts. - Standard Linux commands are not available unless you are using tools like WSL or Git Bash.
🧰 Want Linux-like commands on Windows?
| Method | Description |
|---|---|
| WSL | Full Linux environment. All commands work natively. |
| Git Bash | Lightweight shell with limited Linux command support. |
| PowerShell Aliases | Commands like ls exist, but behave differently internally. |
📊 See the following diagram for a visual comparison of how these systems differ:
🖥 How VSCode Handles Python Virtual Environments
Visual Studio Code (VSCode) offers powerful support for Python development, especially when working with virtual environments. However, the way VSCode interacts with these environments is different from how PowerShell or CMD operates.
Understanding these differences will help you avoid common mistakes and configure your workspace more effectively.
🔍 How VSCode Detects Python Environments
When you open a Python project in VSCode, the editor automatically searches for virtual environments in your workspace. It scans for known folder names like:
.venvenvvenv
If it finds a matching folder, it will display the associated Python interpreter in the bottom-left corner of the VSCode window.
This allows for seamless environment switching without requiring you to run activation commands manually.
💡 Tip: Naming your virtual environment folder
.venvis the most compatible choice for VSCode.
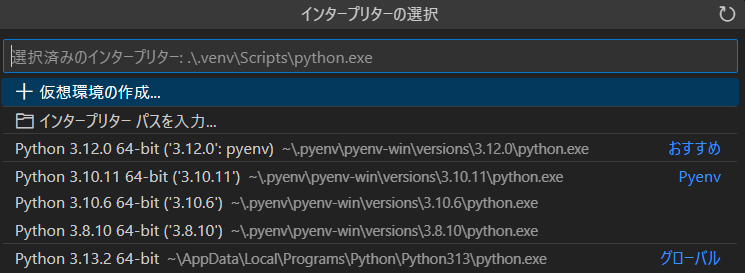
🔄 Selecting a Python Interpreter in VSCode
You can manually select the Python interpreter by following these steps:
- Press
Ctrl + Shift + Pto open the Command Palette. - Type
"Python: Select Interpreter"and press Enter. - Choose the interpreter from your
.venvfolder or a pyenv-managed version.
Once selected, this interpreter will be used for running, linting, and debugging Python code in that project.
📁 VSCode vs PowerShell / CMD Behavior
The key difference is how environments are activated:
| Environment | How Activation Works |
|---|---|
| VSCode | Interpreter selection automatically configures the environment. No need to run activation commands manually. |
| PowerShell / CMD | You must explicitly activate the environment using: .\venv\Scripts\activate (PowerShell) or .\venv\Scripts\activate.bat (CMD). |
✅ Recommended Virtual Environment Setup for VSCode
To make VSCode integration as smooth as possible, follow this convention:
python -m venv .venvThis creates a .venv folder in the project root, which VSCode will automatically detect and prioritize.
If you’re using pyenv, make sure the desired Python version is active before running the venv command.
📌 What Happens Under the Hood?
Even though VSCode shows your selected Python version and environment visually, it doesn’t “activate” the virtual environment in the same way PowerShell or CMD does. Instead, it sets internal configuration paths and environment variables.
That’s why sometimes:
- You don’t see
(.venv)in the terminal prompt. - But the environment is still working as intended.
You can verify it by running:
(Get-Command python).SourceIf the path points to something like .\.venv\Scripts\python.exe, you are using the virtual environment properly.
📄 Understanding the Role of .python-version with pyenv and VSCode
If you’re using pyenv or pyenv-win to manage multiple Python versions, you’ve likely come across a file named .python-version. This small, often overlooked file plays a crucial role in how your Python version is selected—especially within terminal sessions and certain editors like VSCode.
📌 What Is .python-version?
.python-version is a simple configuration file used by pyenv to specify which Python version should be used within a given directory.
It contains a single line of text—for example:
3.10.11
When this file exists in a folder, pyenv will automatically switch to the specified version whenever you enter that directory in the terminal.
This mechanism is known as directory-based version switching.
🔧 How to Create the File
To create a .python-version file, navigate to your project folder and run:
pyenv local 3.10.11This command sets the Python version to 3.10.11 for that specific directory, and creates the .python-version file in the background.
💡 You can also edit this file manually—but using
pyenv localis safer and ensures consistency.
🧠 How Does VSCode Use This File?
VSCode does not directly read the .python-version file. However, when the integrated terminal opens (such as PowerShell or CMD), pyenv detects the file and switches the version behind the scenes.
As a result:
- If you create a virtual environment after switching with
.python-version, it will use the correct Python version. - If you’re using a terminal extension or running scripts inside VSCode, the version defined in
.python-versionwill apply automatically.
⚠️ If this file is missing,
pyenvfalls back to the global version, which may lead to inconsistencies.
✅ Why Is This Important?
Without .python-version, pyenv has no way of knowing which Python version to use for your project. This can cause:
- Confusion when switching between multiple projects.
- Mismatched Python versions in the terminal and VSCode.
- Problems when reproducing environments across different systems or team members.
By explicitly declaring the version in .python-version, you gain:
- Clarity: Everyone working on the project knows which version to use.
- Consistency: VSCode terminals and automation scripts behave predictably.
- Portability: Your project is easier to share or deploy.
📁 Should You Commit .python-version to Git?
In most cases, yes.
If your project depends on a specific Python version, including this file in version control helps teammates and CI pipelines use the same interpreter.
However, if team members use slightly different versions, it may be better to list the version requirement in your documentation or README.md instead.
🧭 Why where python May Not Work with pyenv on Windows
When using pyenv-win to manage Python versions on Windows, you might run into a frustrating issue: the command where python does not return any result—or worse, it returns an outdated or incorrect path.
But don’t worry. This behavior is expected, and here’s why it happens.
🧪 The Root of the Issue: Batch Files and the shims System
Unlike Unix-based systems where pyenv uses executable shims (python, pip, etc.), the Windows version uses batch files such as python.bat.
These batch files live in the shims directory, typically:
C:\Users\<username>\.pyenv\pyenv-win\shims\
When you run the python command, you’re actually running a batch file like:
python.bat → call pyenv exec python → path to selected python.exe
This redirection happens invisibly, but it’s important for understanding what follows.
❌ Why where python May Fail in PowerShell
The where command on Windows is designed to locate executable files (.exe, .com, .bat, etc.) by searching directories listed in the PATH environment variable.
However, in PowerShell, there are some unique quirks:
wheremay refer to PowerShell’sWhere-Objectcmdlet instead ofwhere.exe.- Even when calling
where.exe, it sometimes ignores.batfiles or prioritizes.exefiles from other locations. - Microsoft Store’s alias
python.exeinC:\WindowsApps\can override expected results.
✅ Recommended Alternatives for PowerShell
Instead of where python, use these more reliable commands:
Option 1: Use pyenv directly
pyenv which pythonThis shows the actual full path to the Python version selected by pyenv.
Option 2: Use PowerShell’s Get-Command
(Get-Command python).SourceThis tells you exactly which script or executable will run when you type python.
Example output:
C:\Users\yourname\.pyenv\pyenv-win\shims\python.bat
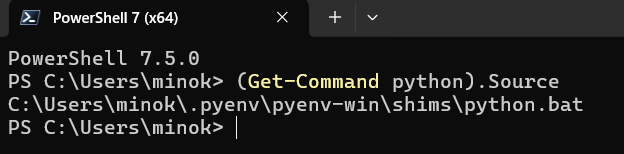
This means you’re correctly using the version managed by pyenv-win.
🧠 What This All Means
Even if where python doesn’t return what you expect, it does not mean your setup is broken.
- Your terminal is still using the correct version through pyenv’s shim system.
- VSCode and virtual environments will continue to work as long as
pyenvis configured properly. - The discrepancy is only in how
PowerShellresolvespythonfor display purposes.
🧭 Why where python Returns Nothing on a Windows PC Without pyenv
You might assume that if pyenv isn’t installed, running where python should at least show the system-installed Python path. But on many Windows setups, especially fresh ones, it simply returns nothing.
This behavior often surprises developers—but it’s entirely explainable.
❓ What Could Cause This?
Here are some common scenarios where where python fails even without pyenv:
🔸 A. Python Is Not Installed at All
The most obvious reason: Python hasn’t been installed yet.
- There’s no
python.exeon your system. - So there’s nothing for
whereto find.
Solution: Download and install Python from the official python.org site or via the Microsoft Store.
🔸 B. Only a Microsoft Store Alias Exists
Windows 10 and 11 sometimes include a virtual placeholder for Python at:
C:\WindowsApps\python.exe
But this is not a real Python interpreter. It’s just a shortcut that opens the Microsoft Store.
where pythonmay still return nothing because the file is hidden or lacks execution permissions.- Even if it’s shown, trying to run
pythonmight open the Store instead of a terminal session.
Solution: Avoid using the Microsoft Store version and install Python directly from python.org for better compatibility.
🔸 C. Python Is Installed, but Not in PATH
Sometimes Python is installed properly, but the installer option “Add Python to PATH” was left unchecked.
- This means Python exists, but Windows has no way to locate it.
where pythonwill return nothing because it’s not in any of the directories listed inPATH.
Solution: Manually add the Python installation directory (e.g., C:\Users\YourName\AppData\Local\Programs\Python\Python311\) to your system PATH.
🧪 How to Check if Python Is Actually Installed
Try running this in PowerShell:
[System.Diagnostics.Process]::Start("python").PathIf Python is installed, this will return the full path to python.exe. If not, it will throw an error.
✅ In Summary
Even without pyenv, there are several reasons why where python might return nothing:
| Scenario | Cause | Solution |
|---|---|---|
| Python isn’t installed | No interpreter exists | Install Python from python.org |
| Microsoft Store alias | Only a virtual shortcut | Avoid using Store versions |
| Python not in PATH | Installer option was unchecked | Manually add to PATH |
Understanding these behaviors helps avoid misdiagnosing issues when working with Python on Windows—especially in clean or beginner environments.
⚙ Using .vscode/settings.json to Automate Virtual Environment Setup in VSCode
If you’re working with Python in Visual Studio Code, configuring .vscode/settings.json in your project folder is one of the most effective ways to ensure consistent environment behavior—especially when sharing projects across teams or devices.
This configuration file helps automate interpreter selection, activate your virtual environment automatically, and enforce consistent coding standards.
📁 Where to Place It
Create a .vscode folder in the root of your project (if it doesn’t already exist), and inside it, create or edit the settings.json file:
your-project/
├── .vscode/
│   └── settings.json
├── .venv/
├── main.py
└── requirements.txt
✨ Recommended Settings
Here’s an example of a robust settings.json configuration for Python projects:
{
  "python.defaultInterpreterPath": "${workspaceFolder}/.venv/Scripts/python.exe",
  "python.terminal.activateEnvironment": true,
  "python.linting.enabled": true,
  "python.formatting.provider": "black",
  "editor.formatOnSave": true
}
🧠 What Each Setting Does
| Setting | Description |
|---|---|
| python.defaultInterpreterPath | Points to the virtual environment interpreter. Ensures VSCode uses the correct Python version. |
| python.terminal.activateEnvironment | Automatically activates the environment when a new terminal opens. |
| python.linting.enabled | Turns on linting to catch syntax and logic errors. |
| python.formatting.provider | Sets your code formatter to Black, a popular opinionated formatter. |
| editor.formatOnSave | Automatically formats your code every time you save the file. |
💡 Tip: On macOS or Linux, change the interpreter path to
./.venv/bin/pythoninstead ofScripts/python.exe.
🚀 Benefits of This Approach
- ✅ You never have to manually activate your environment.
- ✅ VSCode instantly uses the right Python version for that project.
- ✅ Teams working on the same repo get identical behavior.
- ✅ Linting and formatting are consistent, reducing code style conflicts.
👥 Great for Team Collaboration
This method is especially helpful in team projects. By committing .vscode/settings.json to your Git repository, every team member who opens the project in VSCode will benefit from the same environment and coding standards—without any manual setup.
🛠 Troubleshooting: Virtual Environment Not Activated or Interpreter Not Detected in VSCode
Even with all the correct tools and settings in place, it’s not uncommon to encounter issues where:
- The virtual environment doesn’t activate in the terminal.
- VSCode doesn’t recognize the Python interpreter.
- The
(.venv)prefix is missing from the terminal prompt.
Here are the most common causes—and how to resolve them.
❌ Problem 1: The Terminal Doesn’t Show (.venv) Prompt
You’ve created a virtual environment and selected the interpreter in VSCode, but the terminal doesn’t show the environment as active.
✅ Solution
- Check
settings.json
Ensure you have the following line:
"python.terminal.activateEnvironment": true
- Restart the Terminal
After changing settings, always restart the terminal in VSCode. You can do this by clicking the trash icon and opening a new terminal. - Activate Manually (if needed)
If auto-activation fails, run this command manually (for PowerShell):
.\.venv\Scripts\Activate.ps1Or for CMD:
.\.venv\Scripts\activate.bat❌ Problem 2: Python Interpreter Is Missing or Wrong in VSCode
VSCode may not list your virtual environment’s interpreter, or it may default to the wrong Python version.
✅ Solution
- Manually Select Interpreter
PressCtrl + Shift + P, type"Python: Select Interpreter"and choose the path to your.venvinterpreter. - Use
.python-versionwith pyenv
If you’re usingpyenv, make sure the version is defined in a.python-versionfile. Then restart your terminal in VSCode. - Verify the Interpreter Path
In the terminal, run:
(Get-Command python).SourceIt should return something like:
C:\YourProject\.venv\Scripts\python.exe
If it doesn’t, VSCode is not using the expected interpreter.
❌ Problem 3: Python Scripts Won’t Run Properly
You try to run a Python script, but get errors like ModuleNotFoundError, even though the module is installed.
✅ Solution
- Check the Environment Used to Run the Script
VSCode might be running the file using a different interpreter than expected. Make sure the correct one is selected (bottom-left corner of the editor). - Inspect Your Terminal Prompt
If the prompt doesn’t start with(.venv), your virtual environment may not be active. - Run pip in the Same Environment
To confirm you’ve installed packages into the right environment, try:
pip show <package-name>If it returns nothing, you may have installed it globally or in another environment.
🧪 New Insight: .python-version Might Not Be Required After All?
Through recent testing, we discovered something unexpected:
When using VSCode + pyenv-win, it turns out that Python environments can still function properly even without a
.python-versionfile.
Yes—really.
While documentation often emphasizes its importance, in practice, certain combinations of tools and settings allow things to “just work” even if the file is missing.
✅ Conditions where .python-version is not required:
- You’re using a recent version of
pyenv-win(v3.12.0 or later).
Shim behavior has become more robust and predictable. - The VSCode Python extension is up to date.
Interpreter auto-detection has improved significantly in recent versions. - Your
PATHis properly configured.
Thepyenv-win\shimsdirectory is placed at the top of your user PATH variable.
If these three conditions are met, VSCode may automatically detect the correct Python version associated with your pyenv setup—without needing a .python-version file.
💡 Previously (e.g., with pyenv 3.11.x), we observed that environment detection failed unless
.python-versionexisted, and VSCode often required a full restart after changing versions.
With the latest updates, this behavior seems to have improved.
✅ Should You Still Use .python-version?
Yes—as a best practice, especially when working in teams or automating deployments.
It makes your environment deterministic and less dependent on external factors like PATH or editor behavior.
But it’s good to know that it may not be strictly required in all situations anymore.
🔍 Final Checklist: Is Everything Working?
| Check | Expected Result |
|---|---|
(.venv) appears in terminal prompt | ✅ |
python -V shows expected version | ✅ |
Get-Command python points to .venv | ✅ |
Packages installed with pip are found | ✅ |
| Interpreter is selected in VSCode UI | ✅ |
If all of these are true, your environment is correctly set up!
💡 Use Cases Where .python-version Isn’t Necessary
While .python-version is a best practice in many workflows, there are plenty of real-world scenarios where it’s simply not needed:
- Solo development on a fixed environment
If you’re the only one working on the code, and you’re not switching Python versions often, you can skip it. - Quick tests or experiments
When you just want to spin up a.venvto test something, you don’t always need full version pinning. - You’ve already selected the interpreter in VSCode
If the interpreter is set and shows in the bottom-left corner, and your terminal opens with(.venv)active, then you’re good to go.
✅ What counts as “success”?
To confirm that your virtual environment is correctly set up and active:
- You see
.venvselected in VSCode, like:Python 3.12.0 64-bit ('.venv': venv) - Your terminal prompt starts with
(.venv), such as:(.venv) PS C:\YourProject> - The Python executable is actually the one inside
.venv
Run:(Get-Command python).Source
and check that the result points to:.\.venv\Scripts\python.exe
🎯 If all three of these are true—your virtual environment is working. You don’t need
.python-versionin this case.
🎓 Real-World Lessons & Closing Thoughts
If you’ve made it this far, congratulations—you’re already ahead of many developers who still struggle with Python environment inconsistencies on Windows.
Here are a few final thoughts based on real-world experience that don’t always show up in documentation, but make all the difference:
- A virtual environment remembers the Python version it was created with.
If something feels off, delete it and recreate it. That alone solves half of the problems. - Shims are powerful but fragile.
They do their job quietly—until something else hijacks your PATH. When in doubt, runpyenv doctor. - VSCode doesn’t always show
(.venv)—and that’s okay.
What matters is which Python is running, not what your prompt looks like. - Don’t underestimate
.python-version.
That tiny file makes your environment predictable. It’s invisible magic, especially when working across machines or teams. - The best setup is the one you don’t have to think about.
If you configure things right once—.venv,settings.json, andrequirements.txt—you rarely have to touch them again.
🧩 Bonus tip: If things feel weird… reboot your terminal. If they still feel weird… check your PATH. If they still feel weird… get coffee and start over.
🪪 Final Note
This guide is based on trial, error, and a bit of stubbornness.
There’s no one-size-fits-all solution, but hopefully, this gave you a system that works—and makes sense.
If it helped, consider saving a copy for future projects, or even better: teach someone else what you learned.
There’s nothing more satisfying than seeing someone go from “Why won’t it work?” to “Oh, now I get it.”